- Administrator Permissions
- Recommended Screen Layout
- Application Option Dialog
- Projects
- Categories
- Commands
- Composition of a Command
- Global Command Tab
- Create a Command
- Naming Commands
- Rename a Command
- Copy / Move Commands
- Delete Commands
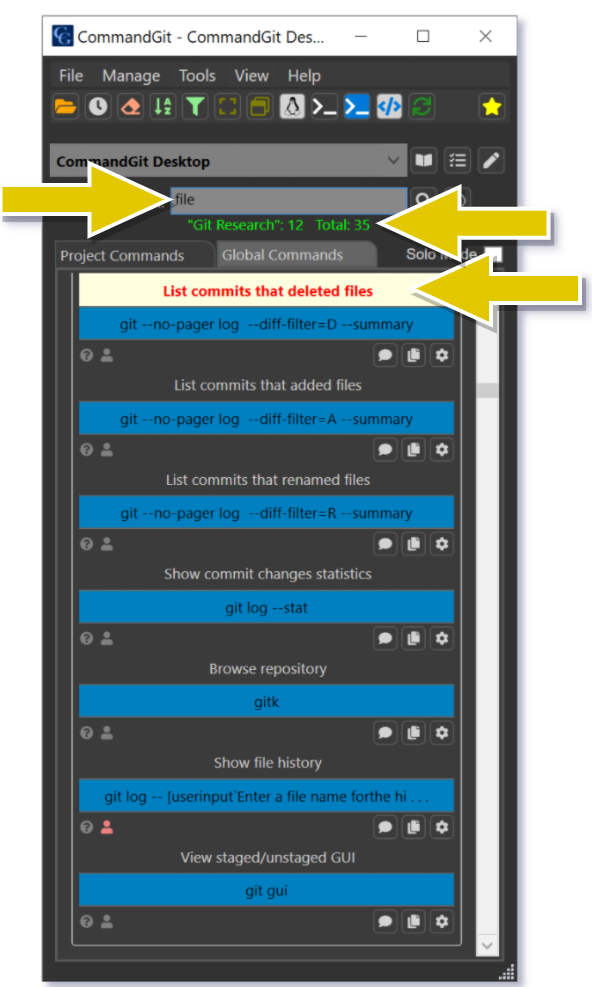
- Command Search
- Git Commands vs Other Commands
- Scheduling Commands
- Configure Command Results Distribution
- Sorting Commands by Category
- Sorting Commands Alphabetically
- Using Command Placeholders
- Before and After Command, File Execution
- Command Script
- Display Prompt Confirmation
- Clear Screen
- Set the Focus to the Terminal Window
- Command Description
- Command Button References
- Online Tutorials
- GPT-3 Artificial Intelligence Integration
- Pre-Created Global Categories and Commands
Administrator Permissions
To gain administrator permission in any terminal session with CommandGit, you can adjust the shortcut’s properties to run as an administrator. This will enable you to execute commands that require elevated privileges, and also prevent Windows from prompting you for additional permissions when launching CommandGit terminals.
Alternatively, you can fix the security prompts when opening Windows Terminal tabs when not an administrator, is to set CommandGit to launch automatically at Windows startup and access it from the system tray. This is the preferred usage of CommandGit as it allows for quick access to the terminal and lets you minimize it when not in use. You can find this setting in the main tab of the Options screen.

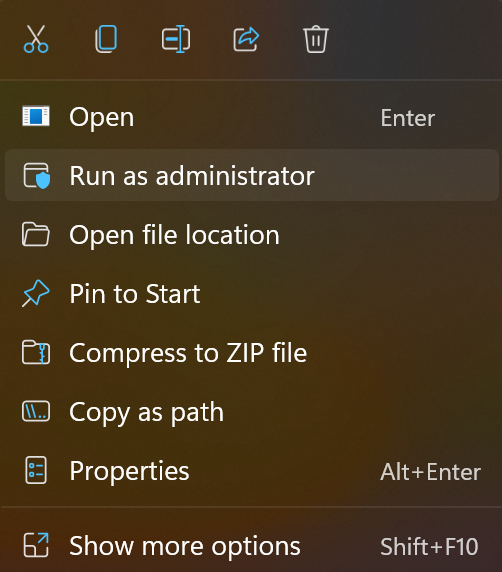
Another way for a one time Admin run is to simply right click the shortcut and choose “Run as Administrator”
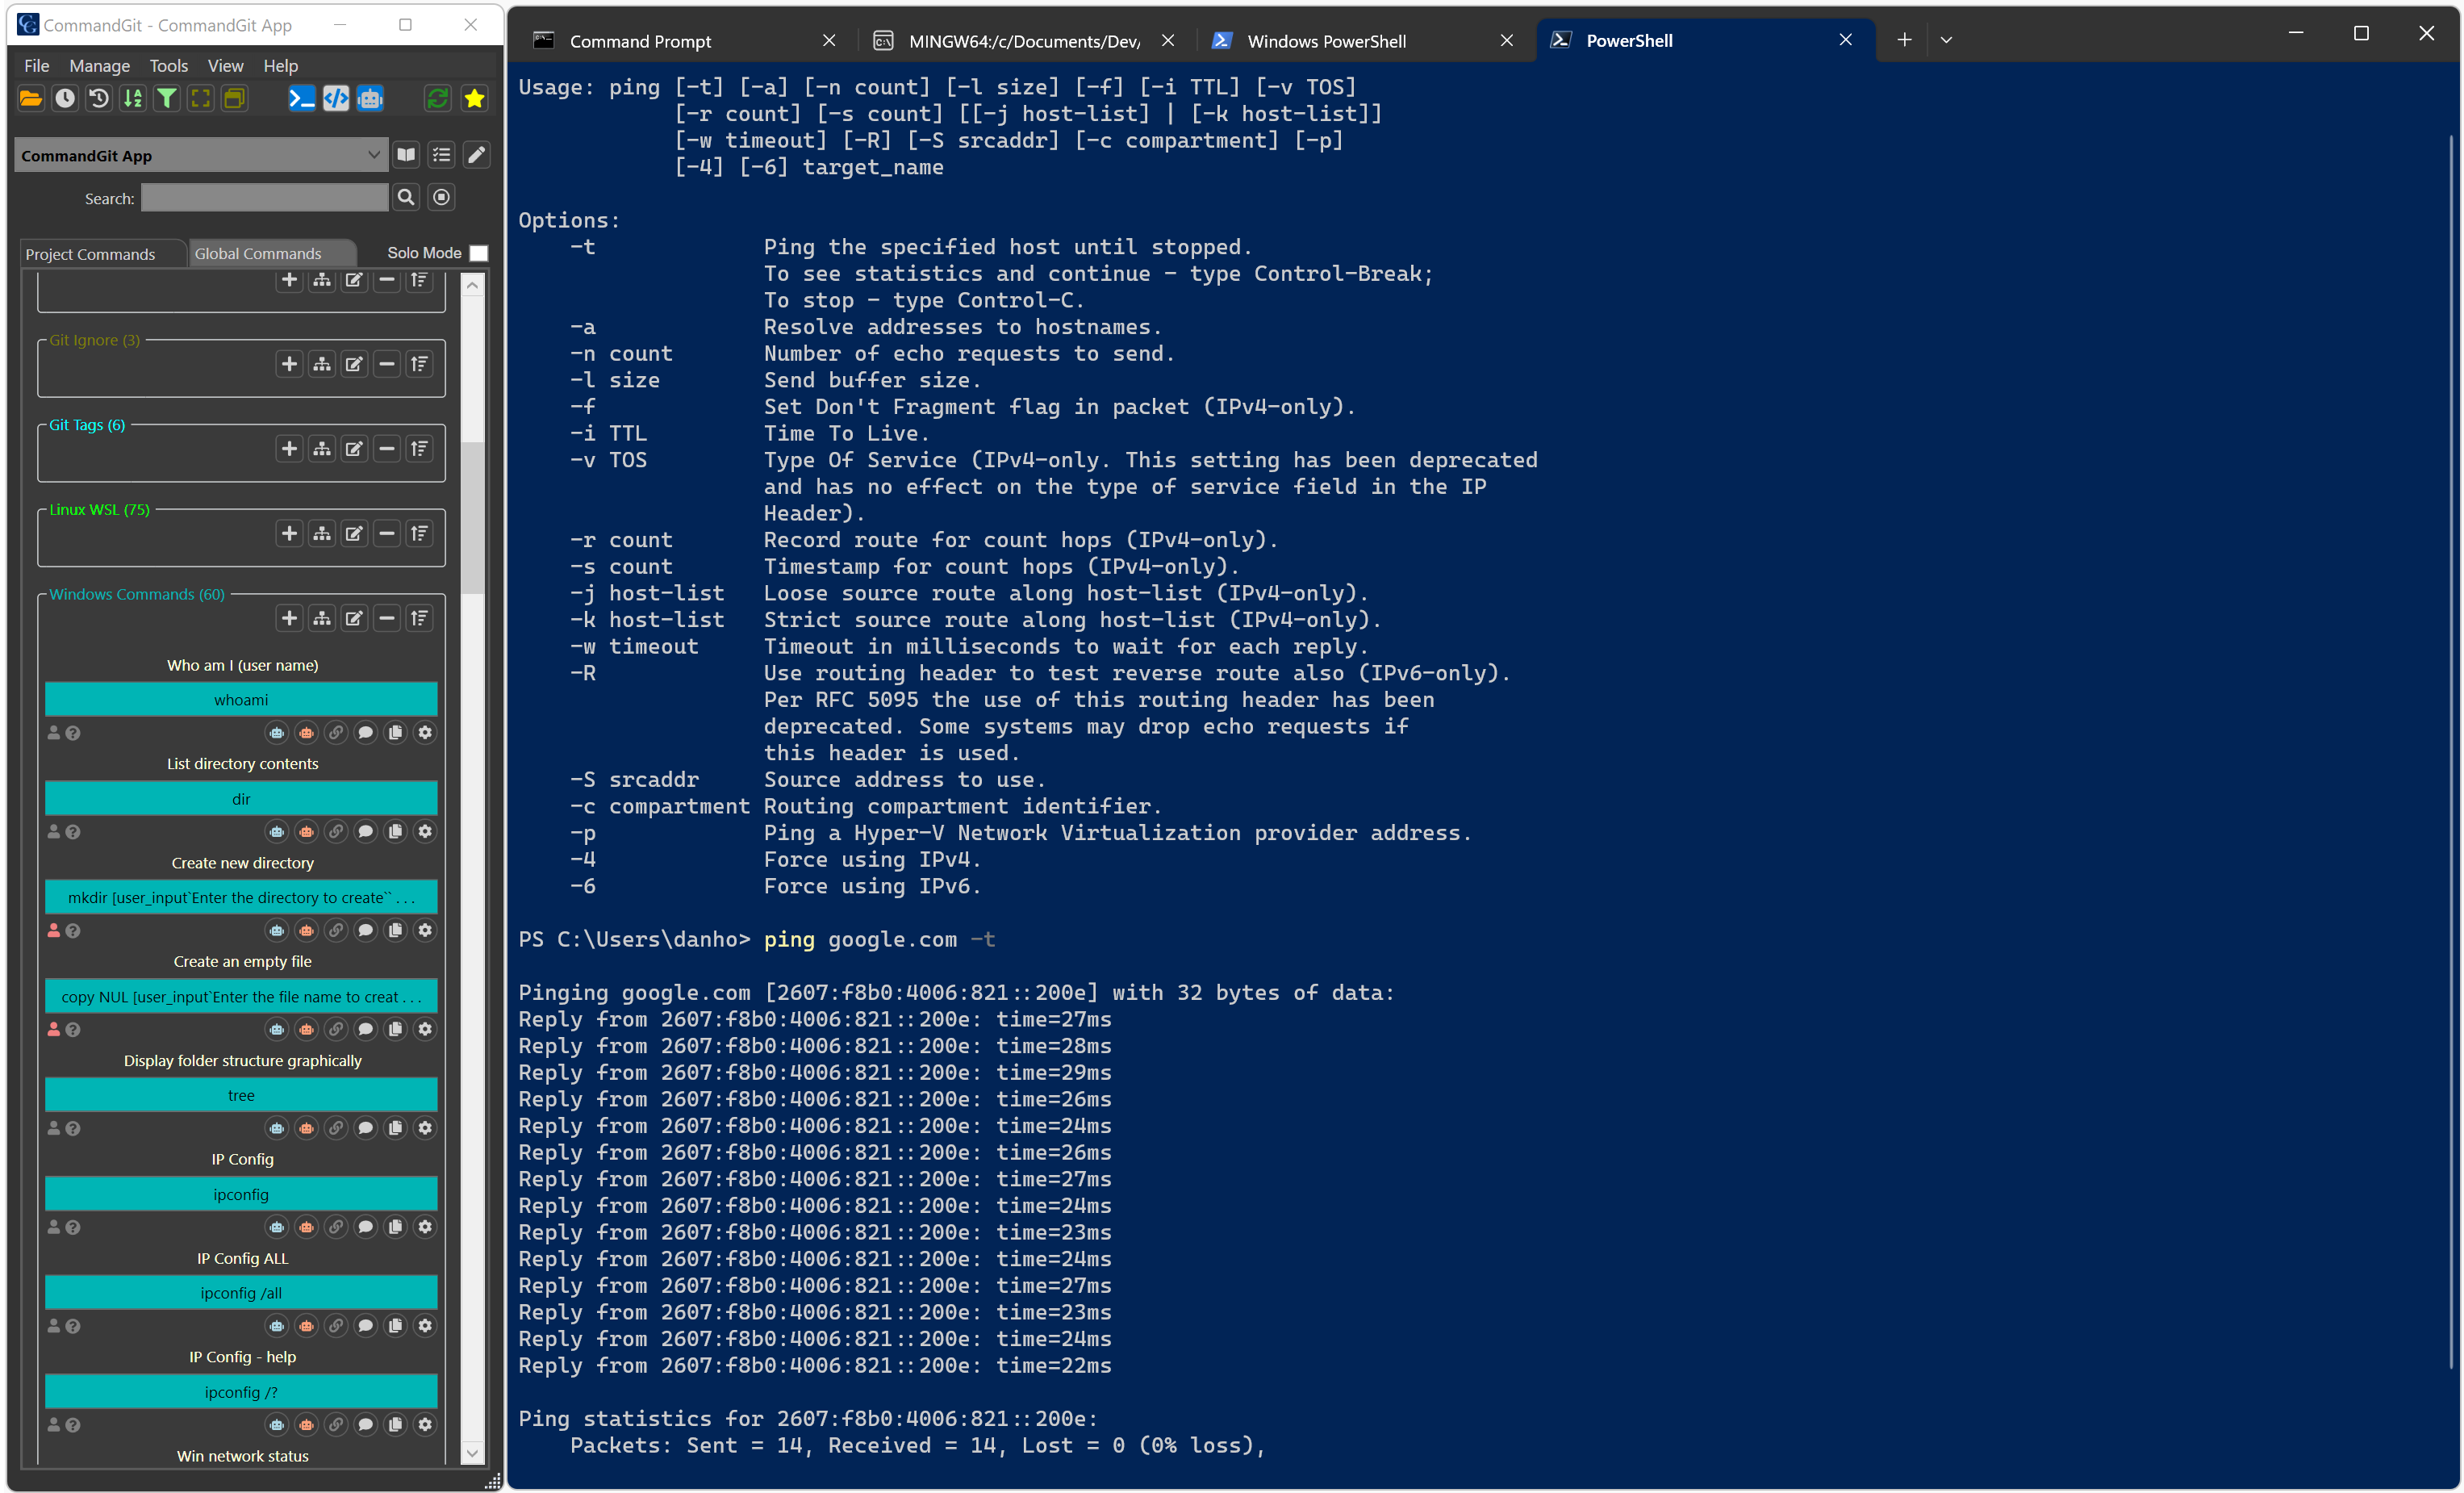
Recommended Screen Layout
To maximize the usage and convenience of CommandGit, you can position and resize the main application window side-by-side with the Windows Terminal window.
To save the current window position, go to the View menu and select “Save Window Position”. Both screen sizes and layouts will be remembered the next time you open CommandGit.
CommandGit was designed to run out of the system tray. This is the preferred usage of commandGit as it will be very quick to render on the screen and to hide when minimized.
Application Option Dialog
Backups
CommandGit has a single setting file where all project configuration is saved. To give you peace of mind about all your hand-crafted commands, the last 1000 versions of this file are saved. A new backup zip file is created on each application startup.
Additional files that are saved in the same zip file are the command notes and the project notes.
The backup copies are saved to the following Windows file system location:
“AppData\Roaming\CommandGit\Backup”
Restore
To restore your configuration from a backup, copy the contents of the zip file “settings.xml” and replace the files in the “AppData\Roaming\CommandGit\Backup” folders. Make sure the application is fully shut down before performing this operation.
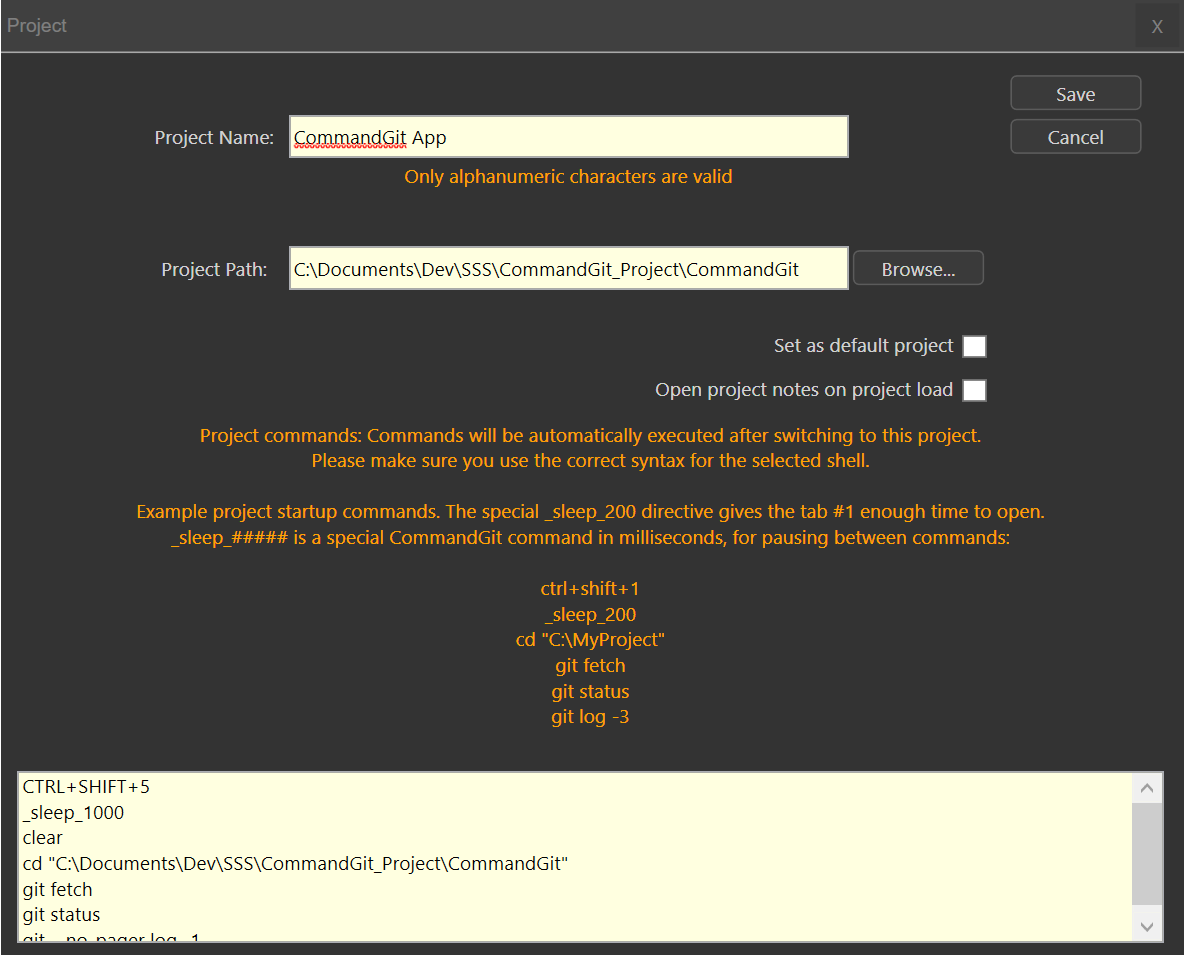
Projects
-
Creating projects will save you time switching between repositories or directories where commands will be executed.
-
Projects can have their own set of categories and commands within categories.
-
Projects can have their own commands that are executed upon loading a project. These can be Git commands or any other commands that you would otherwise need to execute in a terminal window.
-
You can use the project commands section to set up environment variables that can later be used in the categories of that project.
-
Example #1 (project startup commands for Bash):
-
- Open Bash tab in Windows Terminal (look up tab# on the terminal window),
- Wait 300 milliseconds to let the tab finish loading
- Load Ubuntu,
- Set up a variable
- Print the variable back to screen.
1
2
3
4
5
ctrl+shift+5
_sleep_300
wsl --distribution Ubuntu-20.04
local_ip=127.0.0.1
echo $local_ip
-
-
Example #2 (project startup commands for Bash):
-
- Close previously opened Windows Terminal tab
- Open Ubuntu tab
- Wait 300 milliseconds to let the tab finish loading
- Get remote repo information
- Print repo status to the screen
- Show last 2 commits in the current branch
1
2
3
4
5
6
  ctrl+shift+W
  ctrl+shift+4
  _sleep_300
  git fetch
  git status
  git --no-pager log -2
![image-prj-options.png]()
-
-
-
Each project supports Rich Text Format notes for saving information about that project.
Composition of a Project
-
Project name (alphanumeric characters only)
-
Project repository folder path for Git or for any directory path where you want the terminal to navigate to upon opening a project
-
Project commands — these are executed when a project loads.
-
Project categories
-
Project category commands — each project gets its own set of categories that can include as many commands as needed.
-
Global category tab — this is a set of categories and commands that have already been pre-created for you. Global tab categories are customizable and always available across all projects. They can act as a starting point. Commands can be copied from the global categories to the projects where they are most often used.
Create, Edit or Delete a Project
Projects represent/point to a Git repository or a directory.
When deleting a project, the actual project directory the project points to and files within it are never deleted.
Projects are there to isolate a body of work and to provide the ability to create categories and to custom commands that can be executed on a repository or a directory.
Projects allow you to quickly navigate to a local code repository or a directory, and to execute commands on that directory.
Projects can be configured with a default set of commands that will be executed when navigating to that project.
Files or folders can be deleted using your configured commands. Pay close attention to the commands you are executing to avoid inadvertent mistakes or disasters. Please take the extra step to take advantage of the built-in prompts before executing more sensitive commands assigned to buttons. Each button configuration has a checkbox on the button configuration screen. This checkbox can prevent you from executing commands by accidentally clicking on a button.
There are two ways to invoke the project management screen:
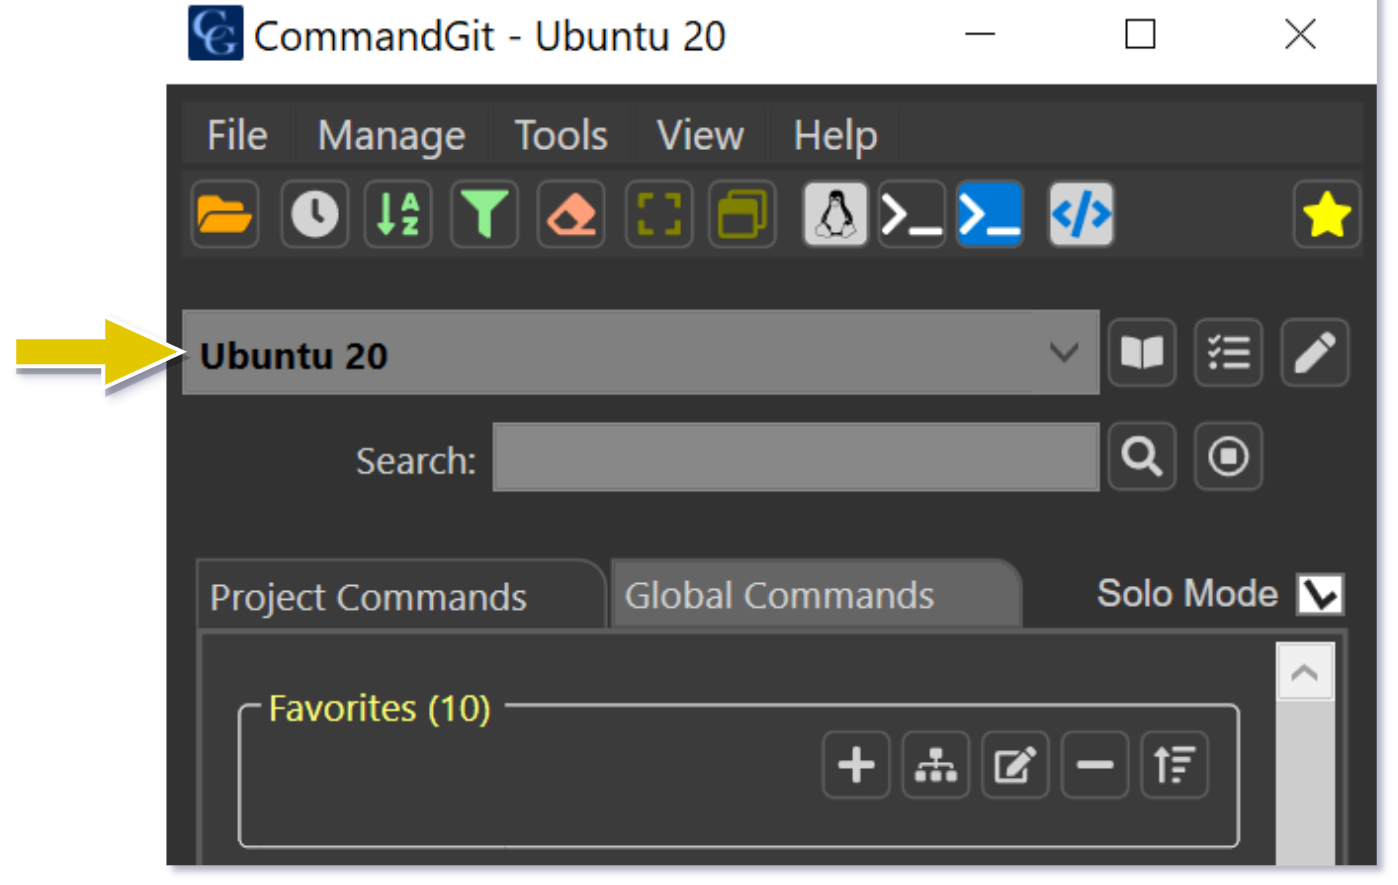
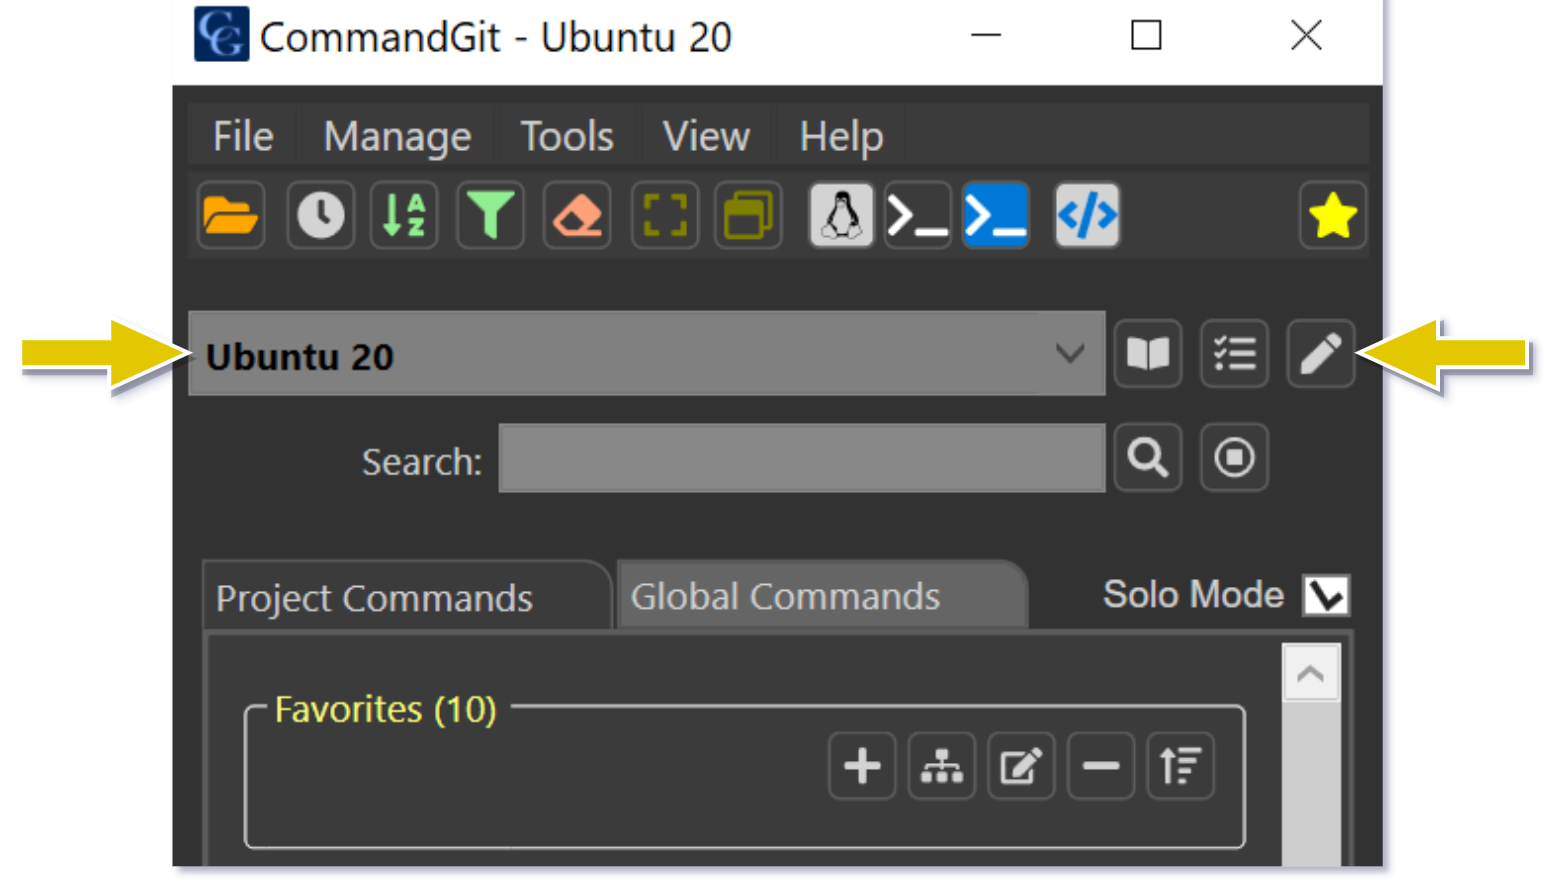
- The “Manage” menu item
- The pencil icon next to the projects dropdown on the main screen
Create or Edit a Project
Step 1
Create a new project or edit an existing project.

Step 2
-
Enter the project name — an alphanumeric field of 60 characters at the most.
-
Enter the project path — the path where your directory/files reside — this can be a local Git repository or a plain non-Git directory.
-
Enter any commands that you would like to be executed when you navigate to this project from the projects dropdown selection menu on the application main screen.
Remember to use the command language that corresponds to your terminal shell selection. This is especially true when executing chained Git commands. All Git command samples in the Global Commands tab were written to work with Bash. You can use any terminal, but make sure the command formatting is correct for the Shell you are using.
Git repositories get an extra safety feature which allows for validating command execution on the intended directory in case you navigate away from the repository main folder.
-
If you would like to load this project when the application starts, please select the “Set as default project” checkbox.
This setting can be overwritten within the setting in the Options dialog that can be configured to load the last used project on the next application startup.
-
Click save and then you will be taken to the previous screen.

Step 3
Position your project within the project list that will be displayed in the projects dropdown menu on the main screen.
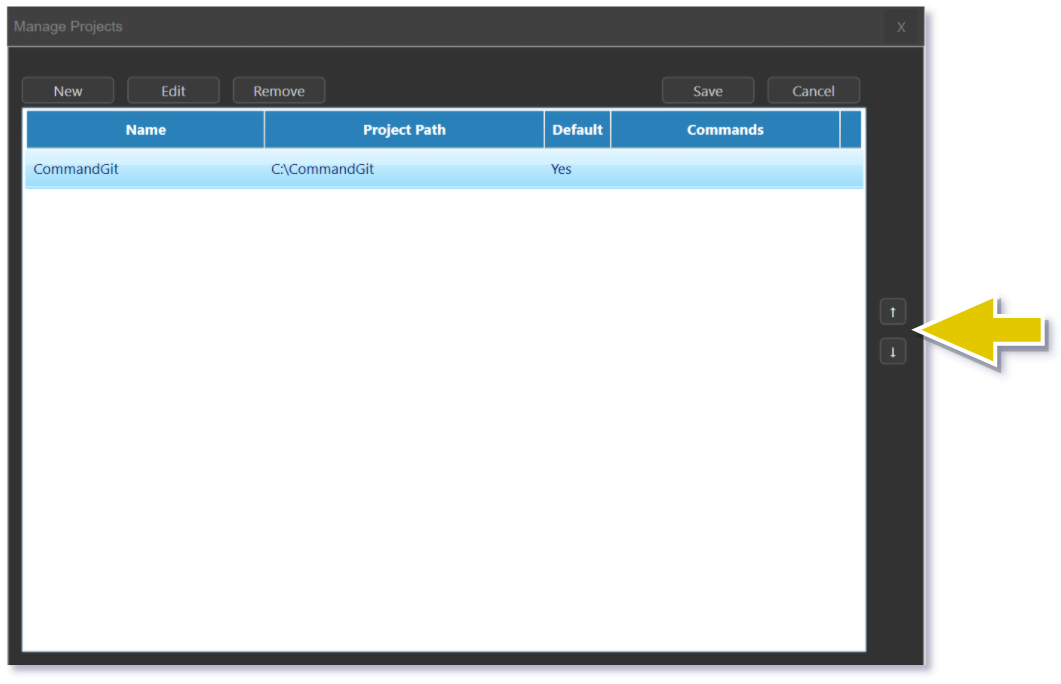
Step 4
Click save to exit this dialog. Your new project will now be selectable from the projects dropdown menu on the main screen.
Project Notes
You can add a more descriptive note to any project. This note can be created in the Rich Text Format (RTF).
It is possible to copy and paste RTF text into the project notes.
Each note is a file on the disk and you can basically create notes of any size.
Categories
Since the number of commands that CommandGit can process is so substantial, it became clear in the beginning that simply creating buttons for commands was not enough. There was a need to further associate and organize commands. A flat category list within each project was chosen over more convoluted nested tree style configurations. The issue with nested trees is that they hide data so they don’t seem to be a good fit to quickly navigate and skim through commands. Too many nested levels of commands hidden behind more closed tree nodes do not offer the script learning experience that browsing through a flat list provides.
Composition of a Category
-
A category belongs to either, a project tab or a global tab section.
-
A category name is an alphanumeric string of 20 characters in length.
-
Category color — all button commands will take on this color.
-
A category occupies a position in the list of categories for the current project.
-
A category can also be collapsed or opened by clicking on its caption text.
-
The open or collapsed state of a category is saved on a project-by-project basis.
-
Hovering over any category icon will display a short tooltip description.
-
Categories can function in solo mode. When the solo mode is activated, only a single category will be open at all times. All the other categories will remain closed until another one is opened.
-
Each category contains a toolbar allowing for quick access to useful category operations.
-
There is no limit on the number of categories you can create.
-
Categories can be color-coded for quicker access.
-
Color coding categories can help with classifying commands from less to more important commands or from less to more sensitive commands.
![image-20220424211200739]()
![image-20220424211328969]()


Project Categories Tab
- All the categories in the project tab are unique to the currently selected project. They will be loaded when the project is selected in the projects dropdown menu.
- Deleting a project will also delete all non-global categories and commands belonging to that project. This is an irreversible operation, please take extra caution when deleting projects and categories.
Global Categories Tab
- The global tab section contains categories that do not belong to any particular project. These categories are not deleted when a project is deleted.
- Global categories are always accessible by all projects.
- Global categories can be modified and organized as needed.
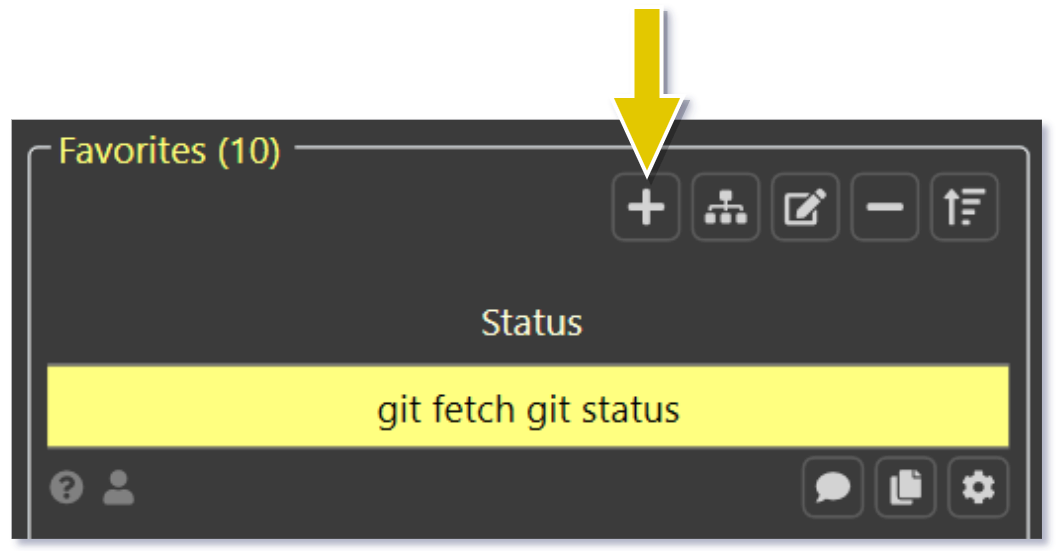
Favorite Category
A favorite category is a special type of category that can be quickly navigated to and that can execute your favorite commands.
A favorite category cannot be renamed, moved, deleted, or repositioned. It is always available and it is always on top of the category list.
A toolbar button is available for quick access to the favorite category.
The contents of the favorite category are fully editable and can be personalized as needed.
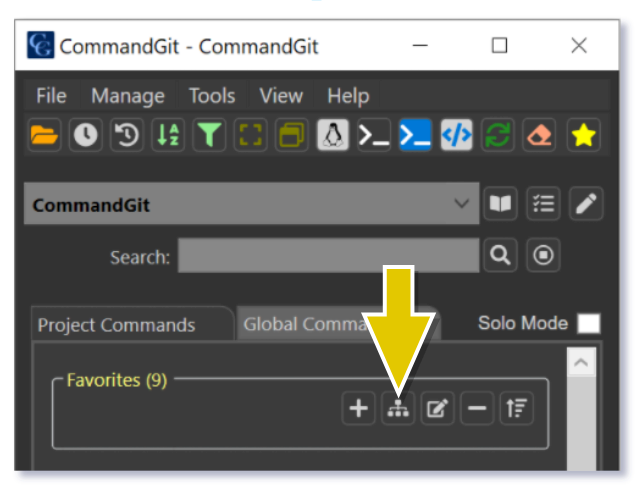
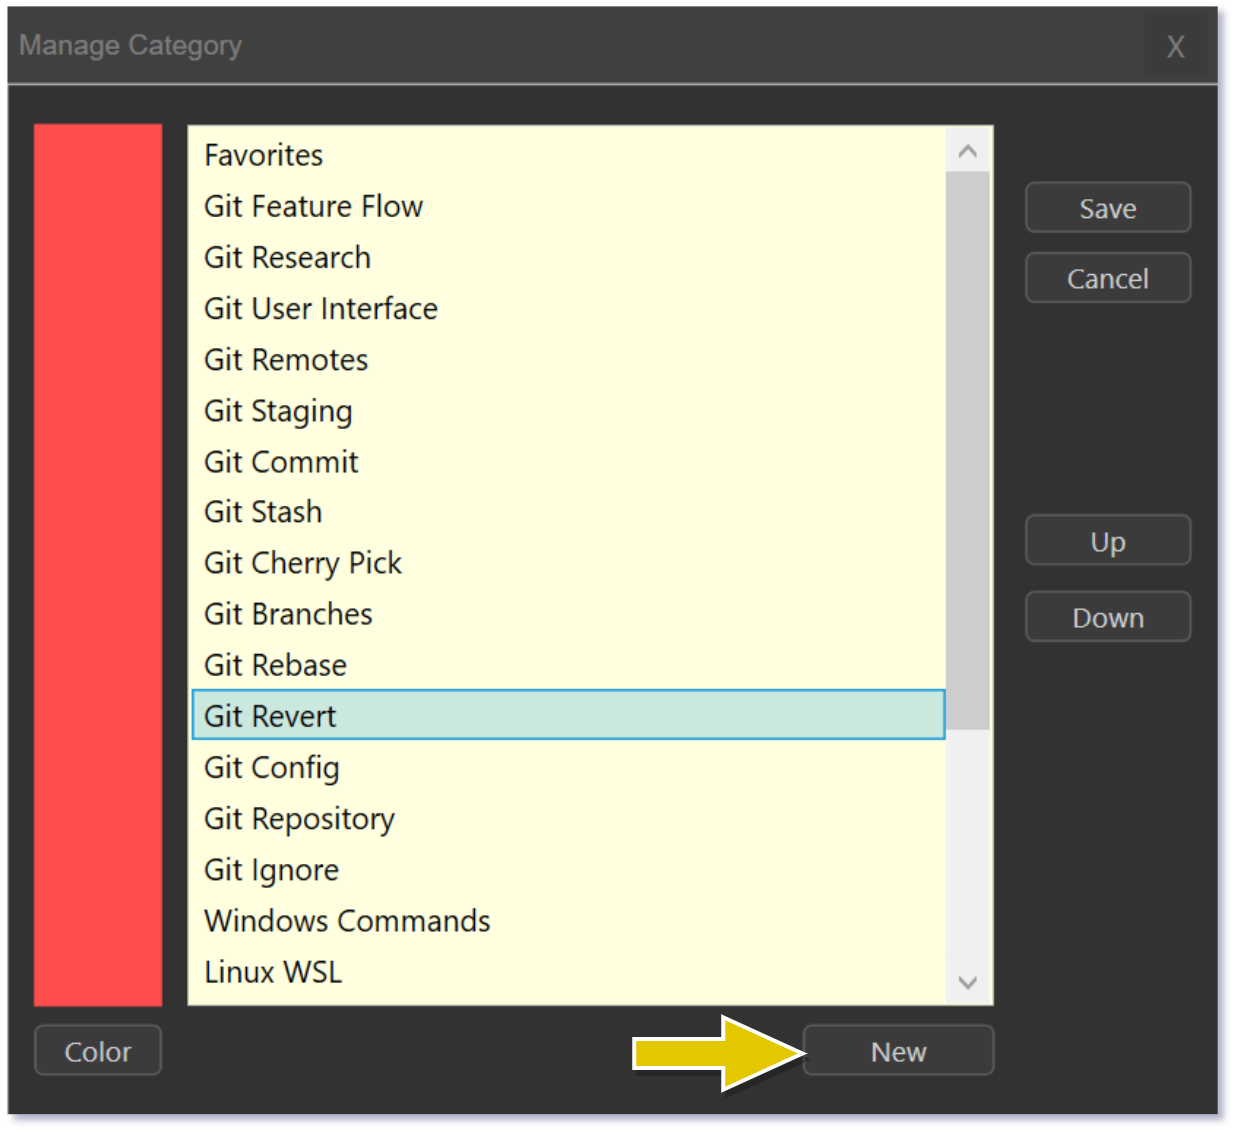
Create a Category
There are two ways to create a category
- Select the Manage/Manage Categories menu item.
- Click the manage button on any category .
Delete a Category
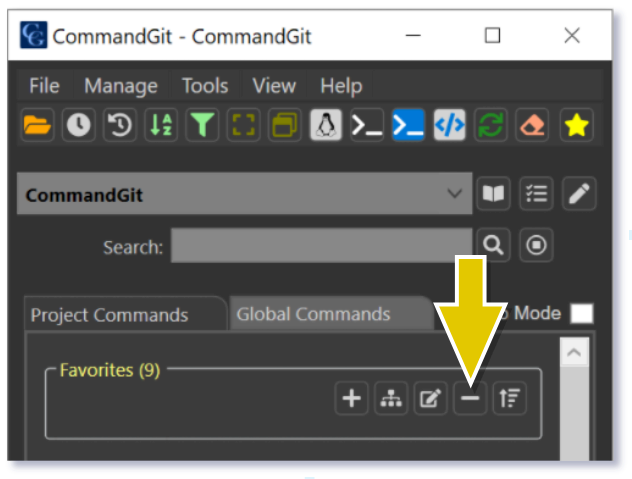
There is only one way to delete an existing category.
Click on the minus sign icon on the category you are attempting to delete. This icon is located on the main application screen.
This action will prompt you to confirm if you are sure you want to delete the category. Once deleted, there is a way to reverse this action, but only if it is a recent delete. Please refer to the backup section in this help guide.
Rename a Category
There is only one way to rename a category.
Click on the pencil box icon within the category you would like to rename. This icon is located on the main application screen.

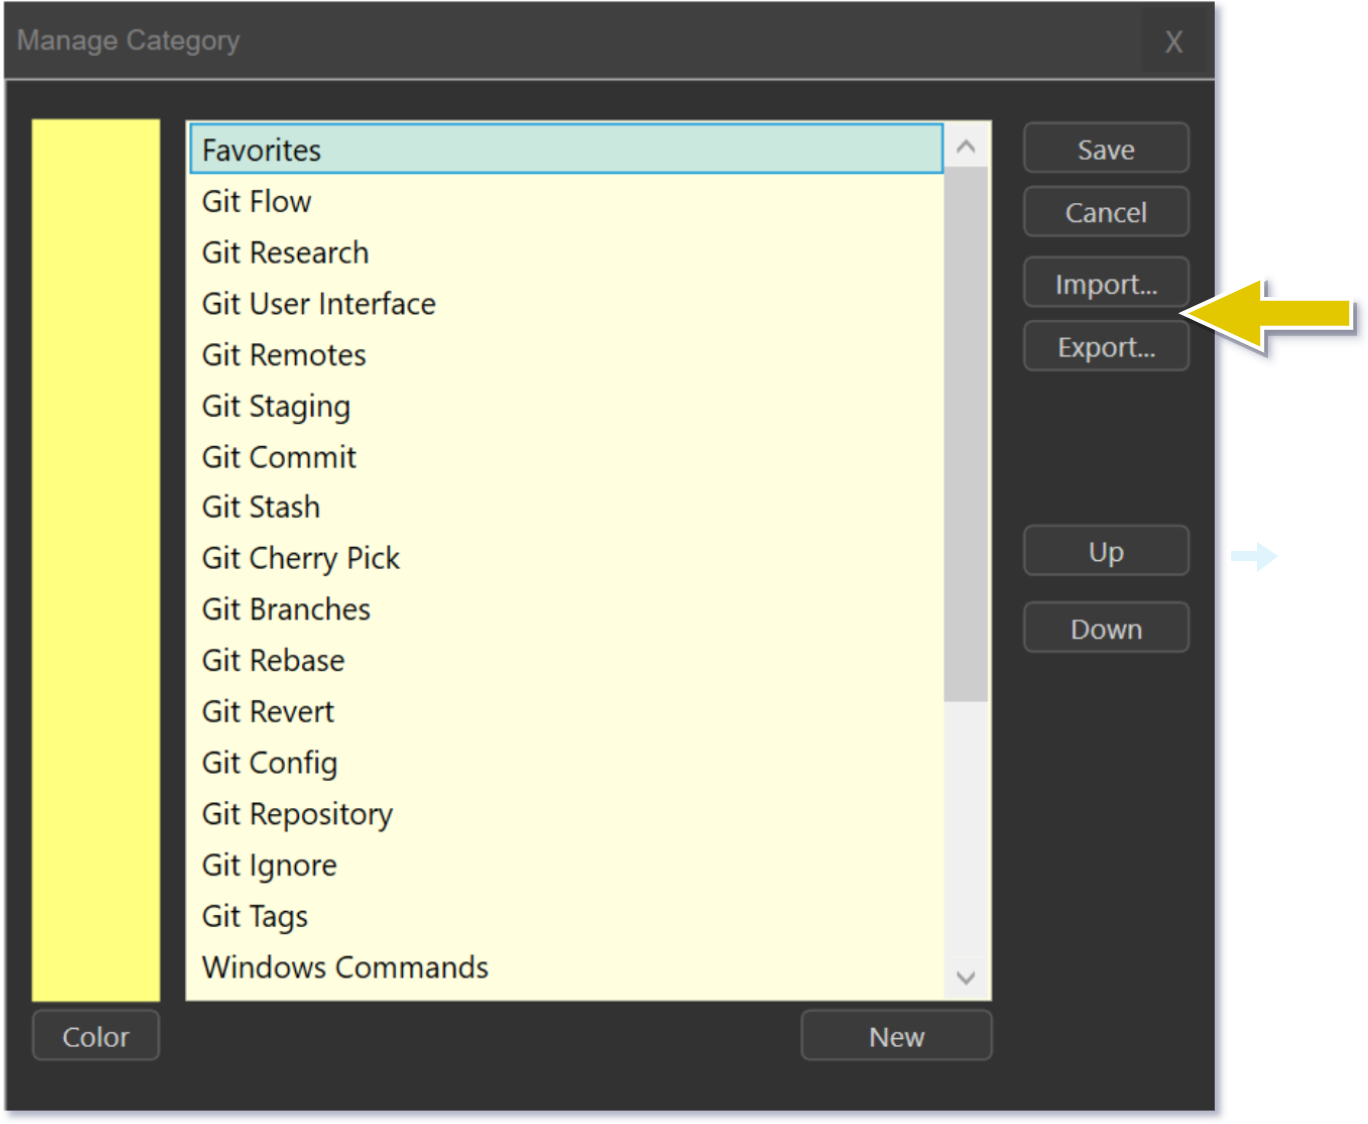
Import and Export a Category
The ability to import or to export a category is available from the File Menu and from the Manage Category screen.
Categories with their associated long description notes and settings can be imported and exported.
This option allows you to share your script commands with other team members.
This feature can be used as a quick versioned backup of category data as all exports are named with the category name followed by a sequential number.
Importing a duplicate category will show a category re-name dialog where you can specify a new name for the category being imported.
IMPORTANT!
Any link references to the commands in an exported category when the category is imported back will be broken as the commands will be assigned new unique identifiers. The link reference out of the category will work as expected. Links referencing any command in this category will not be resolved and you will need to adjust them manually.
What is not Exported to Protect your Data Safety and Privacy
-
Command schedules — all schedule information is exported, but the schedule itself is disabled.
-
Command output distribution emails are not included.
Sort Categories
Categories can be sorted within the current tab according to their level of importance.
- Click on the tree diagram icon which is the category management button to bring up the category management screen.
- Select the desired category.
- Use the up or down buttons to move the selected category within the list.
- Save your changes.

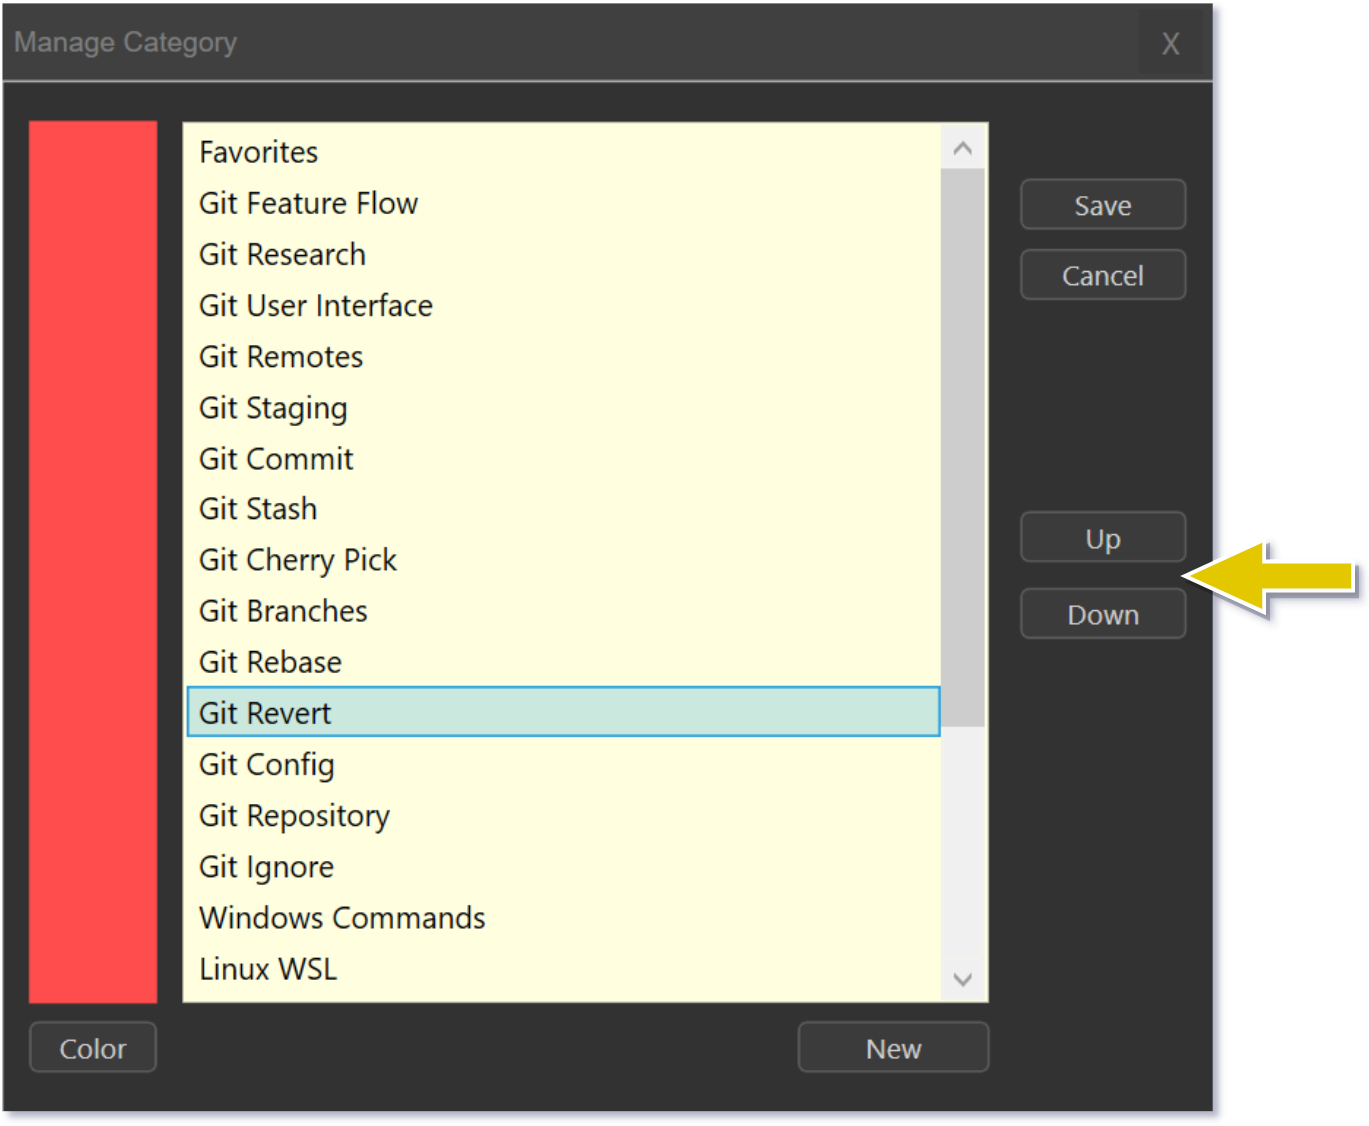
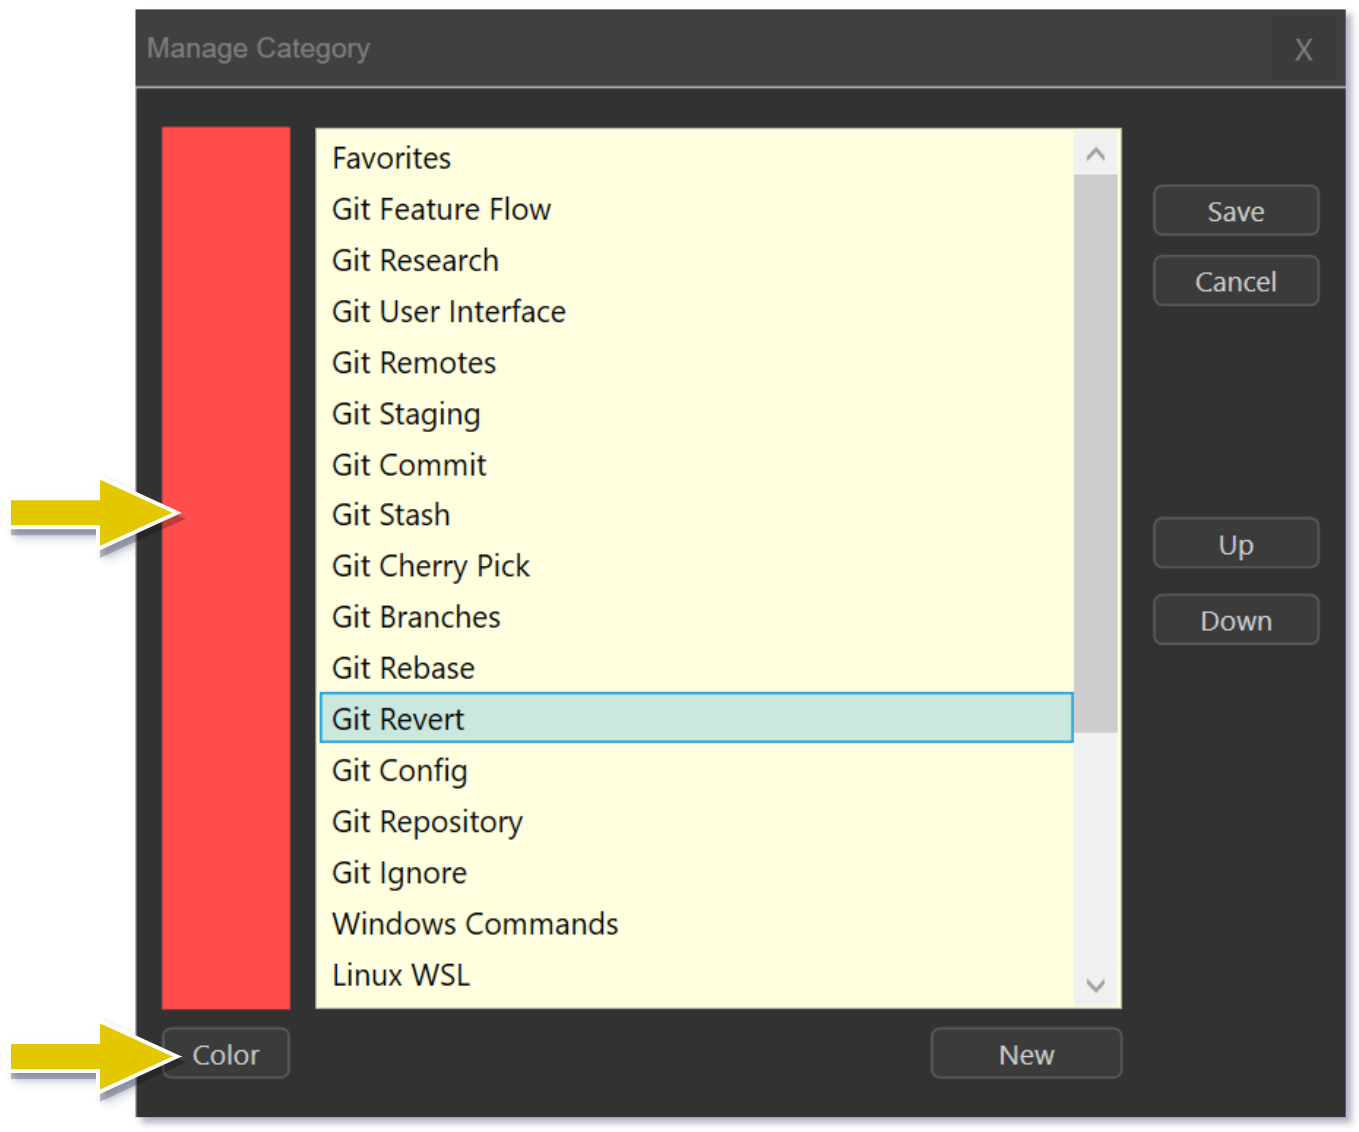
Color Code Categories
The currently selected category color is displayed as a vertical bar on the left side of the category management screen.
You can change the category color to better reflect the importance of the category commands.
All the command buttons within a category will inherit the category color.
The category color is also used across other screens when working with categories or command buttons. This will remind you of the importance of the commands you are working with. This feature is meant to function as an added layer of security making sure you are aware of the actions being performed by executing commands.
- Click on the category management button to bring up the category management screen.
- Set a new category color or change an existing category color by either clicking on the color button or the vertical color strip.
- Save your changes.
Category View
By Category
The category commands can be sorted and presented in two ways:
- Category view — all commands are grouped by category.
- Alphabetical view — all commands are sorted alphabetically, consequently, the category borders will not apply.
By Alphabetical Order

Commands
Composition of a Command
Commands belong to categories and categories belong to projects.
Commands without UI placeholders can be scheduled.
Commands with Windows Terminal hotkeys cannot be scheduled.
It is not advisable, but it is possible to use non-unique command names.
An unlimited number of commands can be created.
Commands can be displayed in a category or in alphabetical order.
It is possible to manually sort/position commands within a category.
Commands may include custom CommandGit placeholders that resolve at the command execution time.
User input and the date picker will prompt the user for an entry. These commands cannot be scheduled.
It is possible to run Windows scripts or executable programs before and/or after the command execution.
Global Command Tab
This is a set of categories and commands that have already been pre-created for you. Global tab categories are customizable and always available across all projects. They can act as a starting point. Commands can be copied from the global categories to the projects where they are most often used.
In order to use global commands, you must first create a project. Projects are configurable to assist with command executions and add to the overall command execution experience.
Create a Command
To create a new command, click the plus sign button in any category group and refer to the topics in this section for naming and configuring the command properties.
Follow your best practices for naming commands. There is no limitation on command naming format or duplicate entry validation.
Naming Commands
-
A command name / label can have a maximum of 60 alphanumeric characters.
-
Command names do not need to be unique.
-
An unlimited number of commands can be created within a category.
-
Commands can be renamed.
-
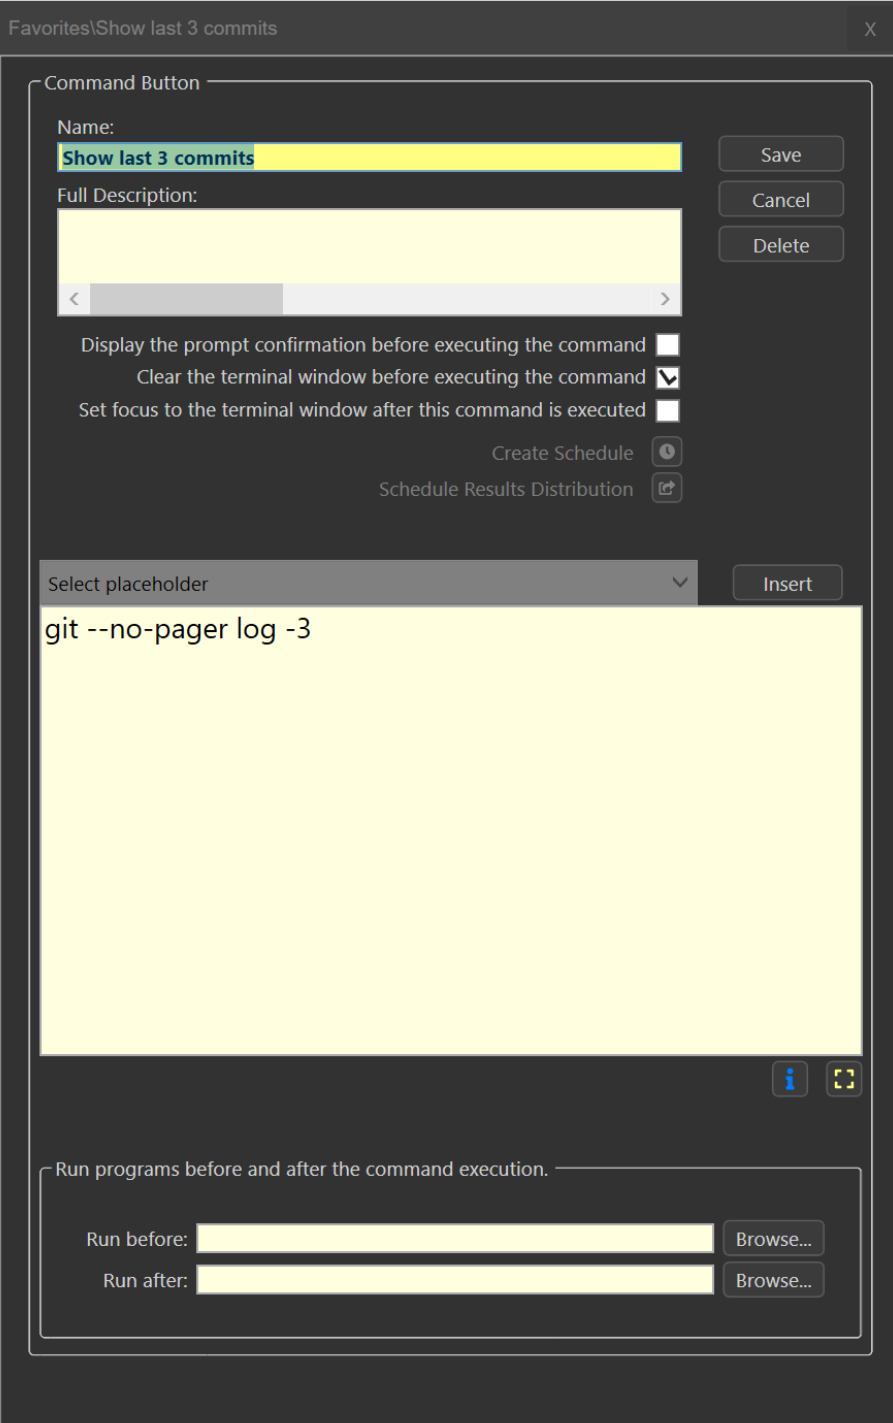
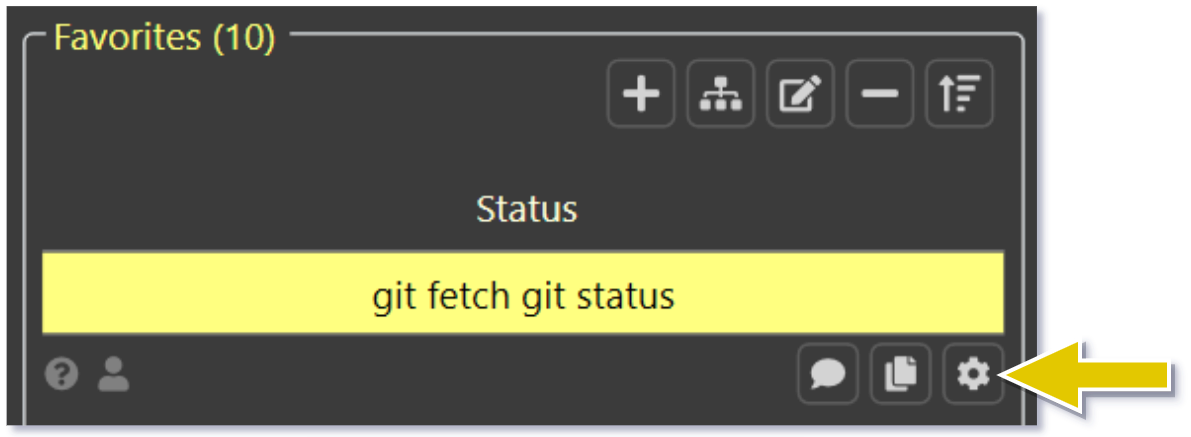
The command naming dialog can be accessed by clicking on the gear icon which is the command properties icon:
![image-20210823214312765]()
Rename a Command
- A command can be renamed at anytime by clicking on the gear icon which is the command properties icon.
- It is possible to rename a command with an already existing command name. Please keep this in mind to avoid confusion or wrong scheduling of Git commands. Consider not using duplicate names to prevent mishaps.
Copy / Move Commands
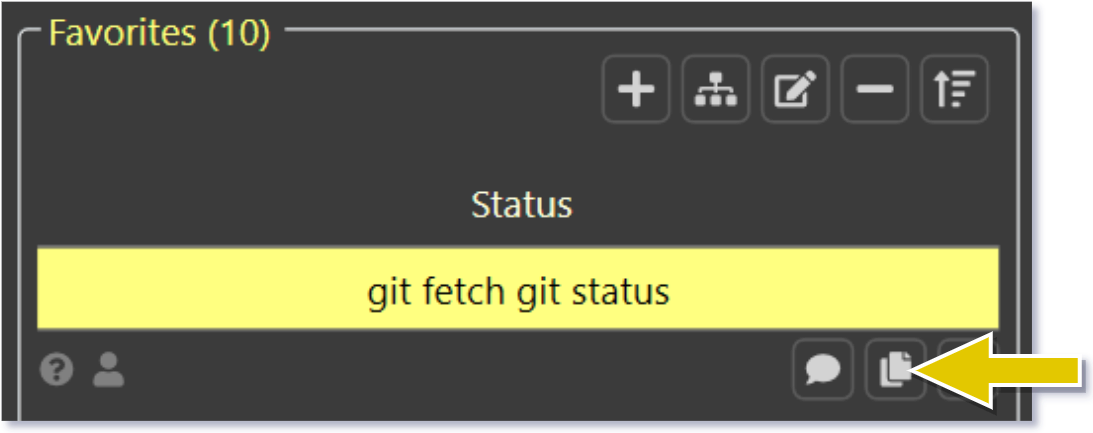
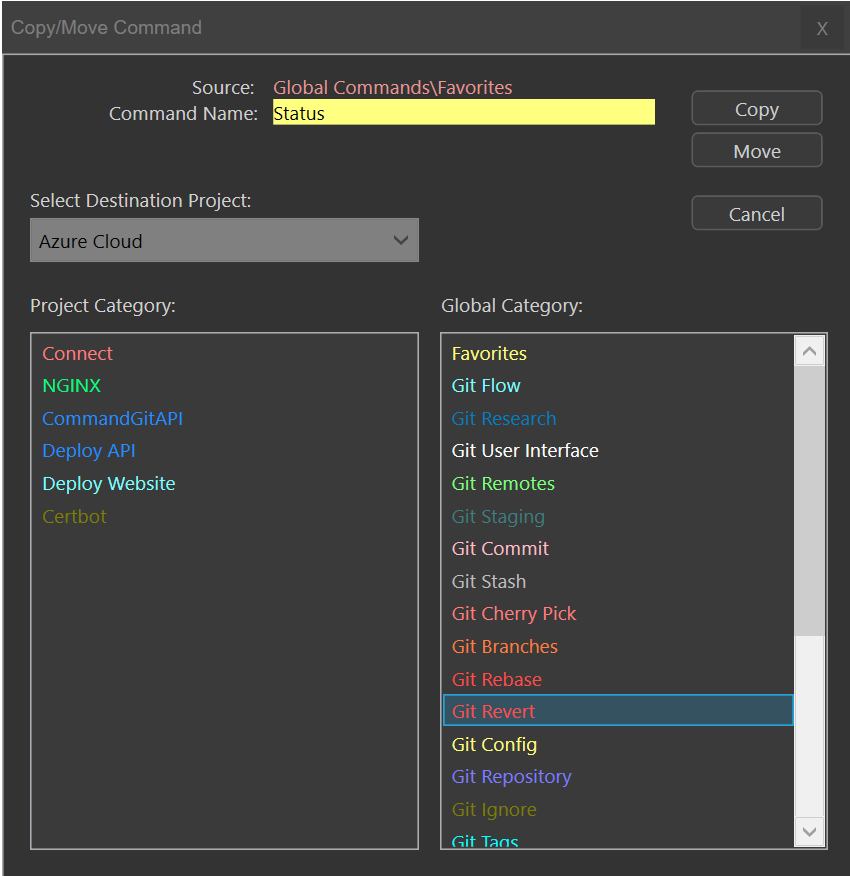
- Commands can be copied or moved across projects and across categories.
- Commands can be copied or moved between the project categories and the global categories.
- When copying a Git command with an attached schedule, the schedule will be disabled. This is done to protect you from inadvertently running commands. All schedule information will be carried over.
Delete Commands
- This operation cannot be reverted.
- Deleting a Git command will also delete any schedule attached to it.
- Deleting a Git command will also delete the command results distribution attached to it.
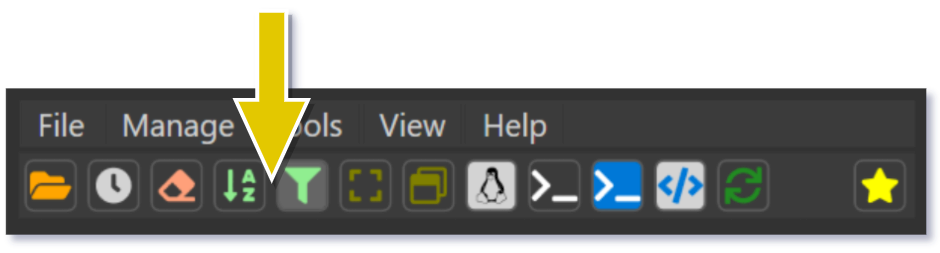
Command Search
Search for commands across categories and projects.
- To get the focus into the search field you can either click on the search icon or press F3 and start typing to narrow down the search.
- Typing a partial search term will start searching all the commands in all the categories in the current project and will highlight the found command labels.
- A label under the search box will show you how many commands have been found in the current category. As you continue clicking on the search icon or pressing F3, you will advance to the next found command, which will be highlighted. Another label will display the total number of commands found across all categories.
- Advancing to the next found item will scroll it to the top of the commands list when highlighted.
- The search can be cancelled by clicking on the stop search icon.
Git Commands vs Other Commands
Git Commands:
-
Git Commands are only used in the context of a Git repository.
-
Distribution
- Scheduled command outputs can be configured to be sent to others via Slack, Teams or email.
-
The command results can also be shown as a popup message on the screen.
The distribution configuration can then search for the word “behind” in the output of those two commands and only notify you when it is present or not present, based on the search criteria.
Non-Git Commands:
CommandGit has a special command helper:
1
_sleep_#milliseconds
It can be used to pause between command executions outside of the context of the terminal.
For example:
Open new Bash tab Wait 3oo milliseconds for the tab to fully load Load Ubuntu wait 5 seconds to let it finish loading set up a variable and print it back to the screen.
1
2
3
4
5
6
ctrl+shift+4
_sleep_300
wsl --distribution Ubuntu-20.04
_sleep_5000
local_ip=127.0.0.1
echo $local_ip
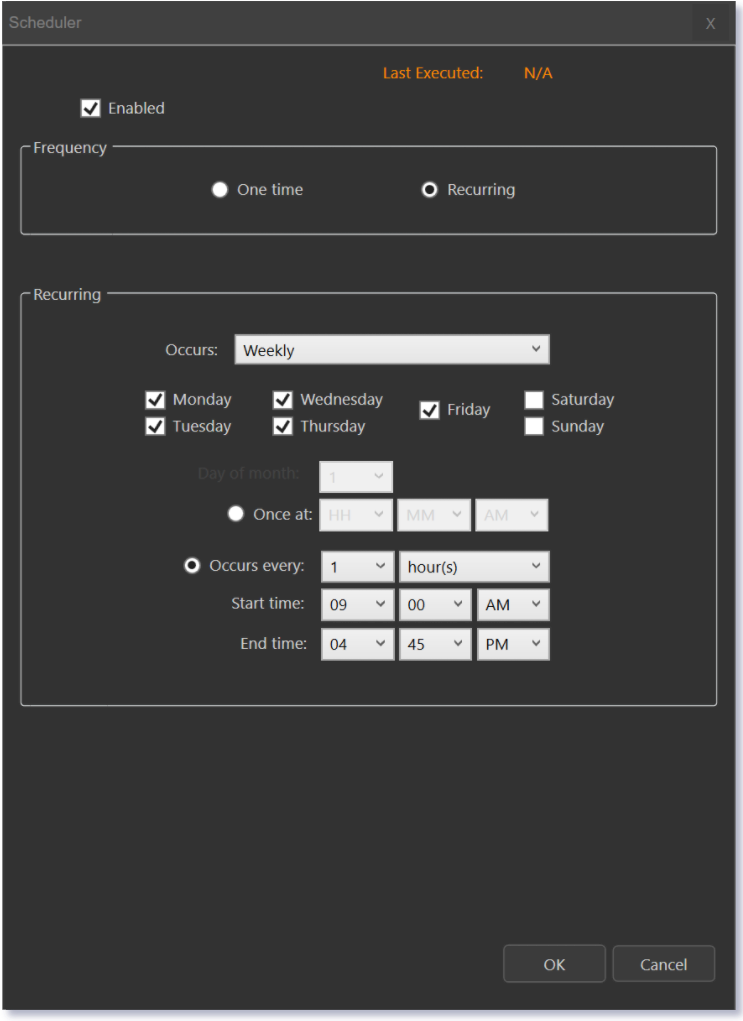
Scheduling Commands
The schedules are executed behind the scenes using the Git executable.
Normally the required git.exe is located at:
“C:\Program Files\Git\bin\git.exe”
It may vary depending on your configuration.
Requirements for Scheduling Commands
- Commands in the global tab are not supported for scheduling and output distribution.
- Please move or copy the command to a non global custom project category in order to assign a schedule to it.
- The CommandGit application needs to be configured to run in the system tray in order to run schedules.
- You cannot chain Git commands.
- You can use a group of Git commands when they are separated by a newline.
- You can chain non-Git commands for PowerShell format.
- All non-Git command are executed using PowerShell behind the scenes.
- You can use a group of commands when they are separated by a newline.
- The command must not include any user interface placeholders such as date picker or the user input dialog.
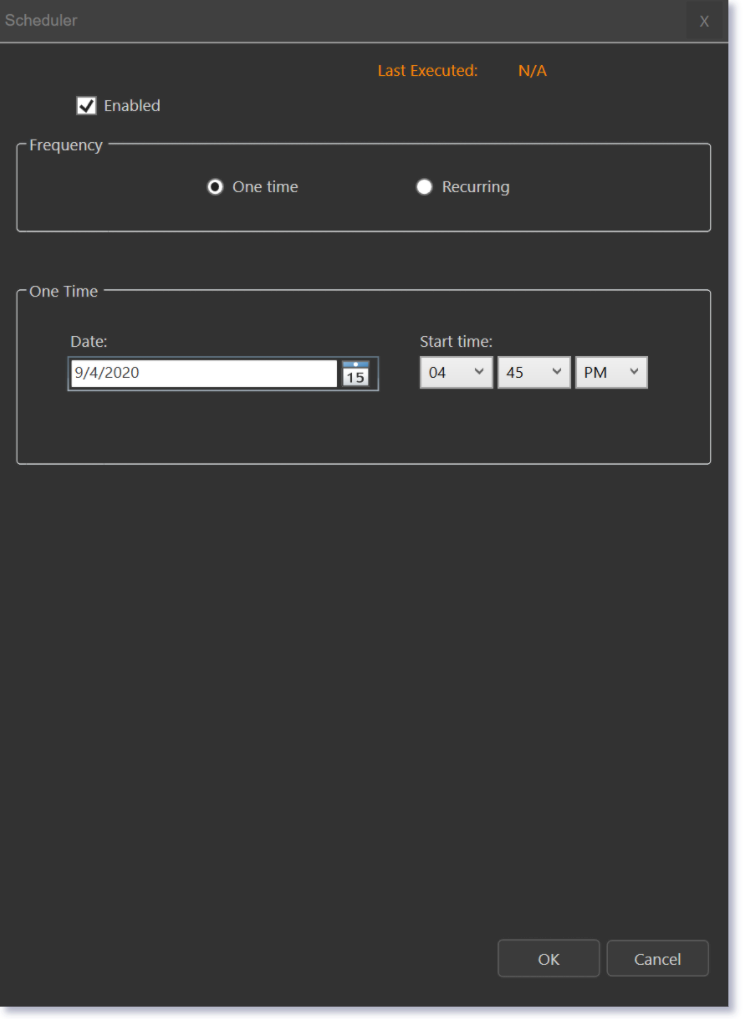
Types of Schedules
One-time Schedules
- Set the frequency to “One Time”.
- Select the date you would like this command to be executed.
- Select the time to execute the command.
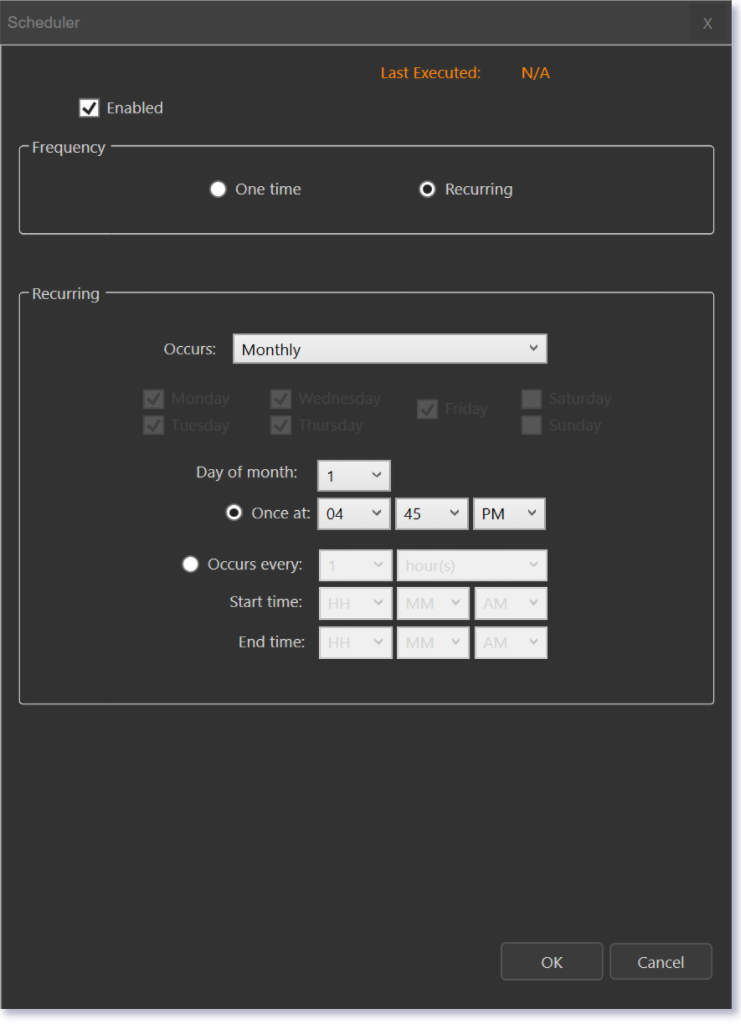
Recurring Schedules
The start and the end time must be within the same day. For example: Start time: 9:00AM End time: 11:59PM The time goes forward 12:01AM to 11:59PM. If you need the schedule to cross over to the next day, please create another command schedule.
Example:
5:00PM to 9:00AM will not work as it will cross over to the next day.
- Set the frequency to “Recurring”.
- Choose how frequently you would like the schedule to run:
- Daily
- Select the day of the week for the schedule to run.
- Either select to run it once at a certain time or use the “Occurs every” option. This will run the schedule every number of hours, minutes or seconds.
- Enter the start and end time between which the schedule is valid. For example, you can set the schedule to run every 2 hours, but only between 9AM and 5PM.
- Weekly
- Select the day of the week for the schedule to run.
- Either select to run it once at a certain time or use the “Occurs every” option. This will run the schedule every number of hours, minutes or seconds.
- Enter the start and end time between which the schedule is valid. For example, you can set the schedule to run every 2 hours, but only between 9AM and 5PM.
- Monthly
- Select the day of the month for the schedule to run.
- Either select to run it once at a certain time or use the “Occurs every” option. This will run the schedule every number of hours, minutes or seconds.
- Enter the start and end time between which the schedule is valid. For example, you can set the schedule to run every 2 hours, but only between 9AM and 5PM.
View All Scheduled Commands across Projects
All schedules can be viewed on a single consolidated view.
This is especially helpful when there are multiple schedules across multiple projects and categories.

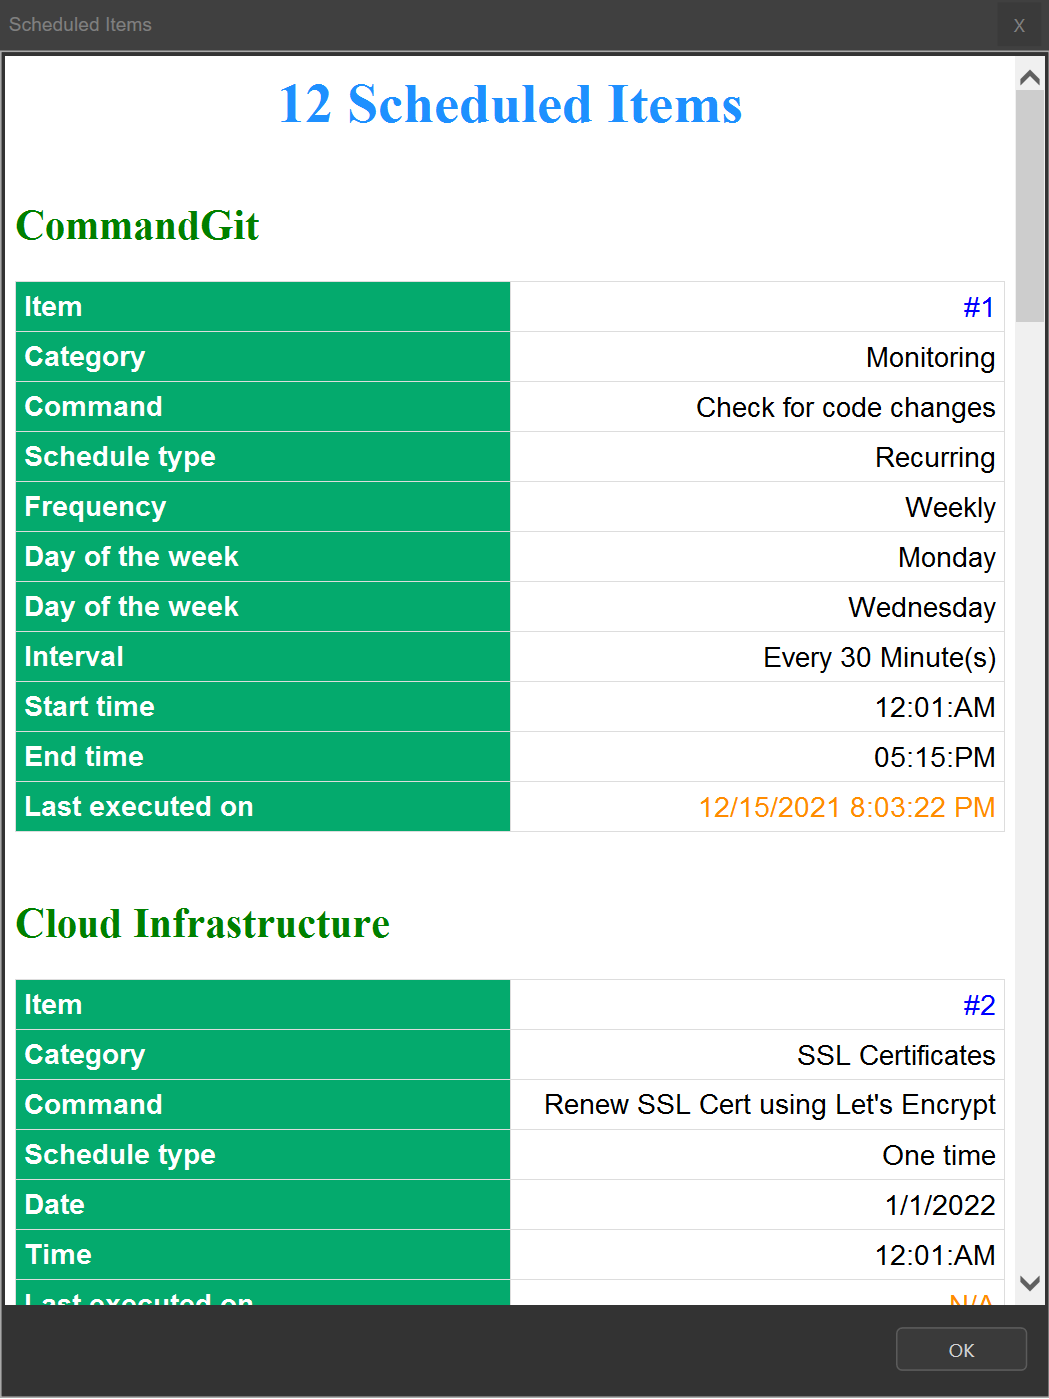
You can see the last 1000 executed commands and the last time they were executed on the scheduled commands history screen.
History / Log View of Scheduled Commands
The last 1000 scheduled commands that executed are recorded and can be inspected for errors or more details.
When the list reaches 1000, the last item is pushed out and the new item takes its place.
History filters:
- Unfiltered
- Contains Error
- Distributed
- Not Distributing

Configure Command Results Distribution
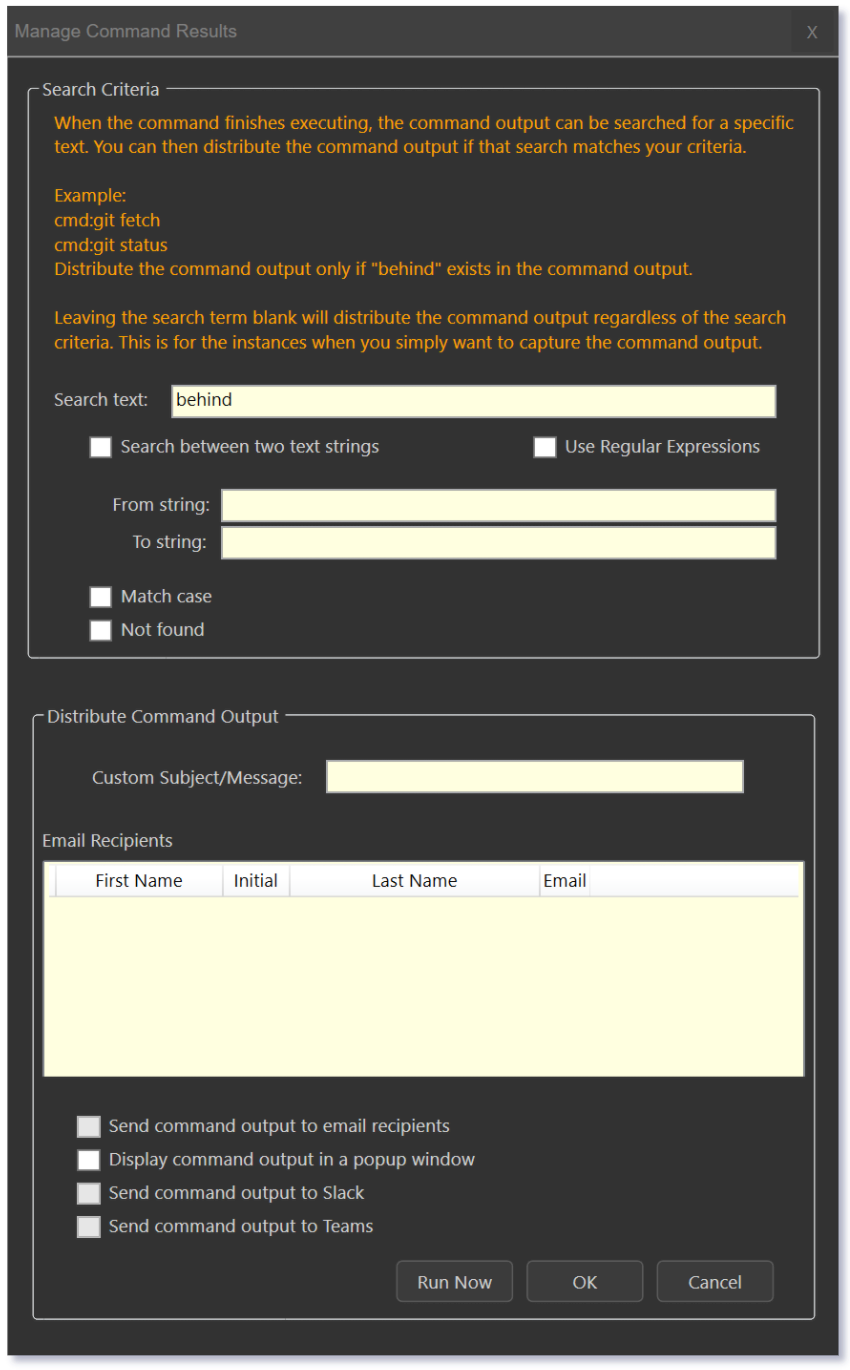
Features and Usage
The command output distribution configuration can be tested by clicking the “Run Now” button. This will immediately run the command and automatically display the results in the popup window if checked. The email, Slack or Teams checkbox can be checked to test those distribution options as well. Keep in mind that the actual commands(s) will be executed.
Requirements and Supported Distribution Types
- Results distribution is only supported for Git commands.
- A schedule must be attached to the command.
- Email
- A valid outgoing email server configuration is required for sending distribution emails.
- A pre-configured list of recipients is required. This can be entered in the options screen under “Email Contacts”.
- Slack
- A pre-configured Slack Webhook is required. This can be entered in the options screen under “Slack Config”.
- Teams
- A pre-configured Teams Webhook is required. This can be entered in the options screen under “Teams Config”.
- Popup screen
- There are no special requirements for the popup screen. This screen displays the same data that is sent via email or via the Slack channel.
Implementation
-
Regular Expressions
Regular Expressions can be used to search in the Git command results. Single or multiple command results are consolidated and Regular Expressions is applied to that group of results.
- In order to use the Regular Expressions results only, set to OFF (default).
- If the regular expression matches anything in the results, the full results are returned.
- In order to use the Regular Expressions results only, set to ON.
- Only the Regular Expressions data is returned.
- For example: Searching for a single word would only return the line(s) the word was found on (subject to your Regular Expressions formatting) and not the full result set.
- Only the Regular Expressions data is returned.
- In order to use the Regular Expressions results only, set to OFF (default).
-
Plain Text Search
-
Option: Not Found
- Only results that are not matched are distributed.
-
Match Case
- Match the search term case.
-
Option: Start text and End text
-
Search lines between two text strings:
This is especially helpful when using the Git blame command. For example, you can specify a single file to query on and search for your name with the option of not found on returned lines between the starting and ending text. This way you can quickly determine if another team member modified your function in that file, and only then distribute the results.
Leaving the search term blank will distribute the command output regardless of the search criteria. This is for the instances when you simply want to capture the command output regardless of the content.
-
-
Sorting Commands by Category
- All commands are shown in the categories you have created in the previous steps.
- The categories opened in a project will be remembered and reopened on startup or when you navigate back to that project or tab.
- Navigating to the global tab and back will also restore the opened categories.
- The default sort order can be set by going into the options screen and choosing how you would like the commands to be sorted on the application startup.
Sorting Commands Alphabetically

- An alphabetical list of commands will be remembered and reopened on startup or when you navigate back to that project or tab.
- The default sort order can be set by going into the options screen and choosing how you would like the commands to be sorted on the application startup.
Using Command Placeholders
In order to use command placeholders, open the placeholders selection dropdown menu in the command properties screen.
Command Placeholder Types

There are two special placeholders that invoke user interface screens to capture user command inputs. These are the “User input” placeholders and the “Date input” placeholders.
Placeholders are inserted directly into the command script and parsed out at the time of command execution. Placeholders should not be modified by hand until their special formatting and placement requirements are understood.
User Input Type Placeholder
How to use the user input placeholders
- Write the command script to the place in the script you would like to capture the user input. With the caret positioned in the correct place in the command, select the user input placeholder from the dropdown menu and press the “Insert” button. At this time, you will be asked to provide the user input prompt message. The prompt message will be presented to you when the command is executed. There may be multiple user input entries in a single command. The prompt will help you describe the user input data required.
- Remember that the placeholder will be replaced by your user entry. Add any required quotation marks in the command around the placeholder.
- For example, entering a Git comment for a commit may require that you enter single quotes around the message portion of the comment body. You can enter those single quotes around the user entry placeholder in the command itself and skip adding it as part of the message on the user entry screen.
- As another example, you can also skip the quotes for a number entry.
- You can find many samples of this in the global tab in any project. You can also change them as you see fit and copy between your projects. The global commands serve as examples and as a starting point for project commands.
Sample commands utilizing user entry placeholder — the bold text is the placeholder entered data in the command.
git add . && git commit -m ‘[user_input
Enter the commit message`]’git log -[user_input
Enter the number of last commits to list`]
Sample user input screen for the above commands — this input screen will be presented when the command is executed.
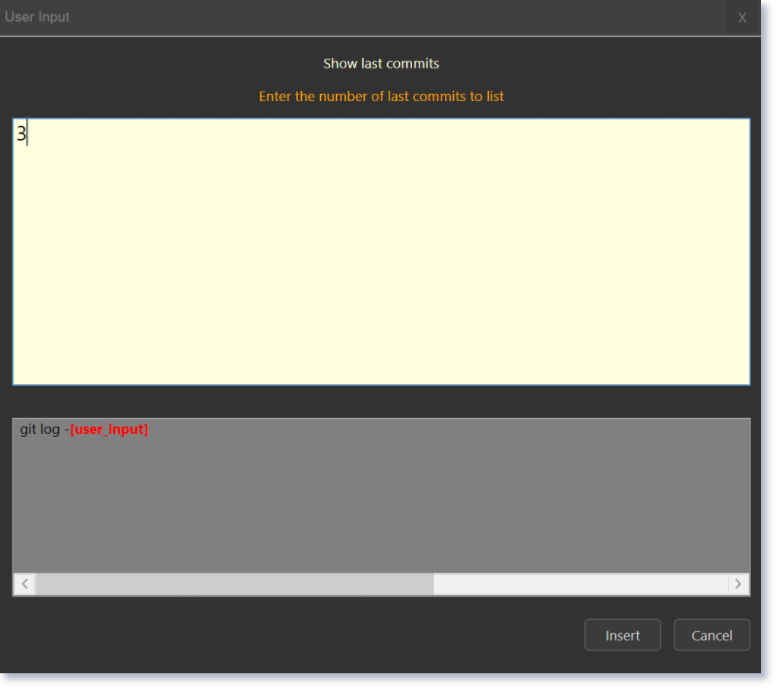
The gray area shows the original command without the custom prompt message, this will help you see exactly what is being worked on and what part of the command will be affected.
The red text will be replaced by your entry in the final command.
If more than a single placeholder is present in the command each time you enter a value and click OK, the dialog will color the next command placeholder in red and replace the previous one with your last entry.
Date Input Type Placeholder
How to use the date input placeholders
The date input placeholder is very similar to the user input placeholder described before. The main difference is that the user input entry is a calendar date picker.
Sample commands utilizing the user date entry placeholder — the red bold text is the placeholder indicator in the command.
git –no-pager log –after=”[date_input
Pick after date`]”
Sample date input screen for the above command — this input screen will appear when the command is executed.

The gray area shows the original command without the custom prompt message, this will help you see exactly what is being worked on and what part of the command will be affected.
The red text will be replaced by your entry in the final command.
If more than a single placeholder is present in the command, each time you enter a value and click OK, the dialog will color the next command placeholder in red and replace the previous one with your last entry.
Before and After Command, File Execution

Each command can execute a Windows batch or shell script file outside of the Git command script. This is accomplished by specifying the path and the file name of the script file. The script file will be executed on a separate thread, totally independent from the main Git command.
These executions can be configured to take place before or after the main command has finished executing.
Command Script
Large Command Input Screen

A large script input screen is available when more space is needed to enter larger blocks of command script.
Command Format
Correct formatting is required for proper execution. The formatting must follow the type of shell script and language chosen.
Command placeholders are inserted into the command script, but are then removed at runtime after performing their job of replacing or adding parts of the command.
For example, using Bash will require Bash formatting and the correct command chaining delimiters. The Windows Command Prompt uses its own format and the PowerShell expands on that adding environment variables.
Special Cases
You cannot chain Git commands. You can chain non-Git commands. You can execute groups of commands separated by a newline.
Display Prompt Confirmation
This checkbox on the command button configuration screen can be checked to show a user prompt that will ask you to confirm if you really want to run the command. You can then cancel or confirm command execution.
This option is especially useful with commands that should be executed with caution.
Another useful function of this option is to prevent you from executing a command that may be incorrect in the context of the project at the time.
Checking this box will give you another layer of security before executing the command.
Clear Screen
It is possible to make sure that the terminal screen is cleared before executing a command. This will reduce the amount of information you have to look at after a command is executed.
Instead of typing Clear Screen into the terminal before each command, you can simply check a checkbox on the Command Configuration screen to have CommandGit clear the terminal for you before it executes the command.
Set the Focus to the Terminal Window
CommandGit will always steal the current focus after executing a command. This enables you to set the focus in the main window only once.
By selecting this option, the current focus will go immediately to the terminal window. This will allow you to execute a command and immediately be able to type in the terminal window instead of having to first click on it to establish the focus.
Command Description
You can add a more descriptive note to any command. This note can be created in the Rich Text Format (RTF).
It is possible to copy and paste RTF text into the notes.
Each description is a file on the disk and you can basically create descriptions of any size.
Copying/moving commands will also copy/move their notes.
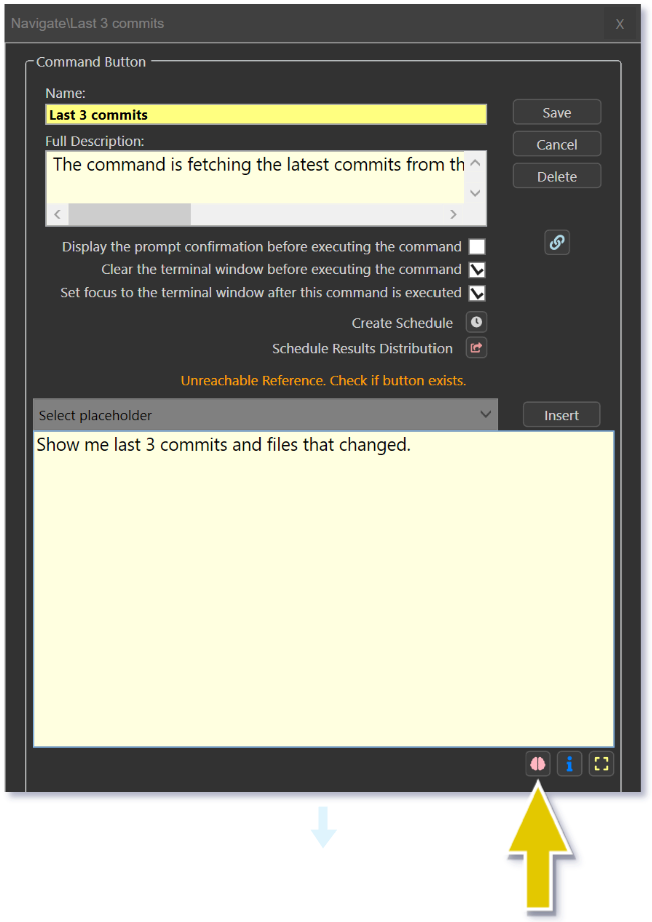
Command Button References
Overview
- You can reference external button commands inside button command script blocks.
- You can create recursive chains of execution by nesting button references as deep as needed.
- To help you keep track of references across your projects, we created a view of all nested references to a particular button command.
- Referencing is supported for scheduled as well as for non-scheduled commands.
- All referenced button script will be inserted at the location of the reference in your button’s script.
- All custom command placeholders including UI user input prompts are supported throughout nested flows.
- Ability to chain buttons was added to enable better script reusability.
- It is possible to reference a button or multiple buttons in a button command. This can be done across all projects and categories and allows for powerful command chaining.
- All references will be resolved recursively at the command execution. The resulting command will include all referenced button commands in its body.
Things to consider:
Command chaining must be correct. That means that you need to anticipate the references being pulled in and adjust the native shell chaining characters accordingly.
All command placeholders will be resolved as well, so if for example, you mean to run a command on a schedule, but one of the nested references includes a user prompt placeholder, that prompt will invalidate and break the command when executed on a schedule behind the scenes without a user interface. As powerful as the button chaining is, care must be taken to inspect all commands in a nested chain.
Creating a Reference to a Button
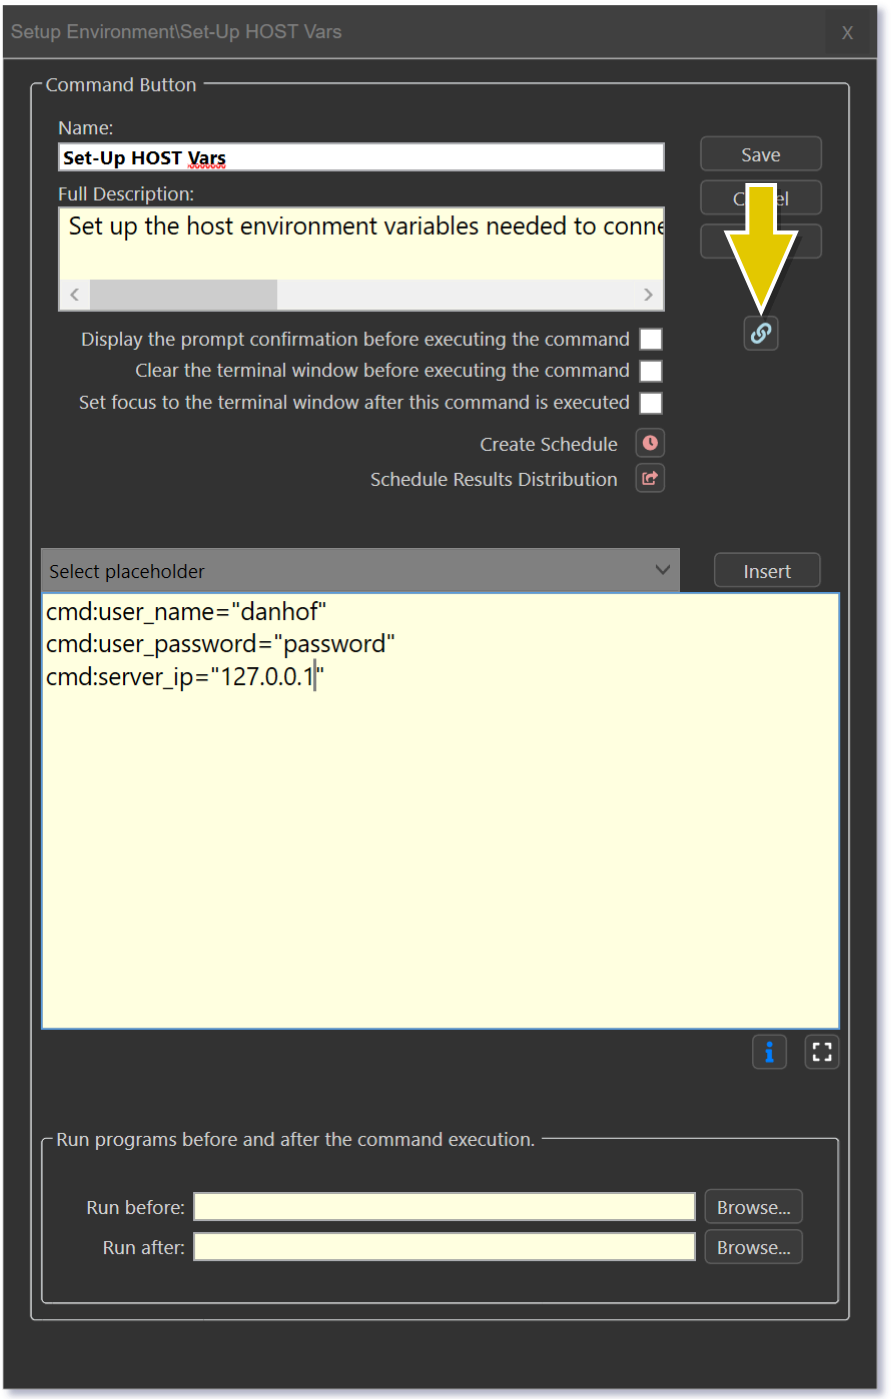
Step #1.
Open the configuration page for the button you would like to reference and click the link button to copy the button reference to the clipboard:
Step #2
Paste the copied reference into a command script block as a new line.
You can double click the reference to display the original path and name of the command being referenced.
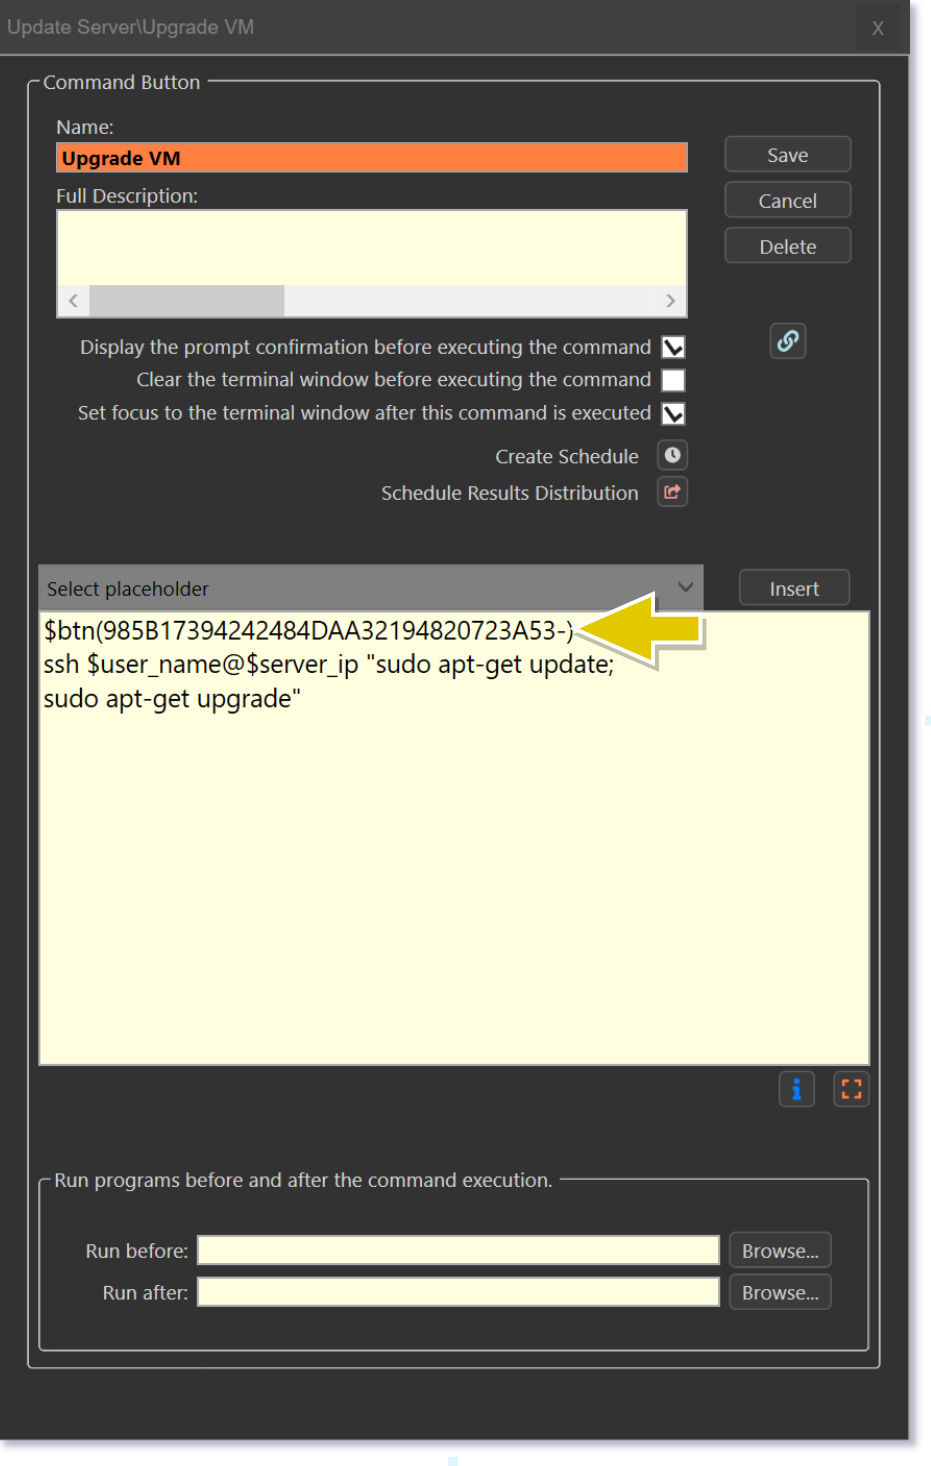
Step #3
Reference indicator:

Step #4
Look up a reference path by double clicking the reference script you pasted into the command script block:

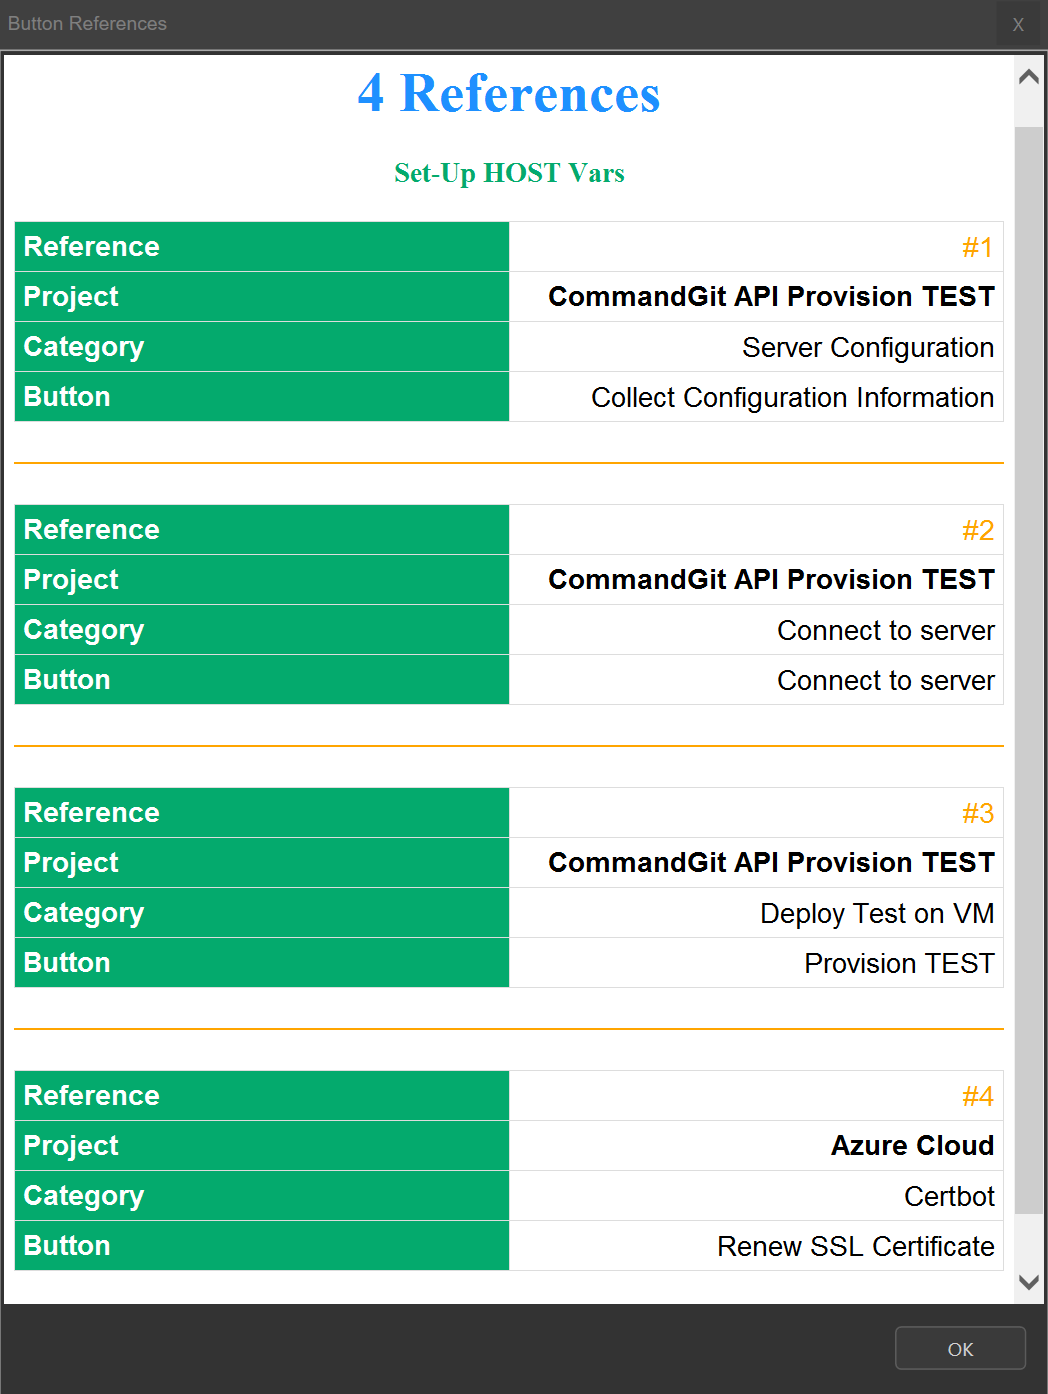
Keep Track of References
There are a number of aids to help keep track of references.
Discover which command buttons reference a button by viewing the list of all references for a given button.
Types of terminal supported by CommandGit
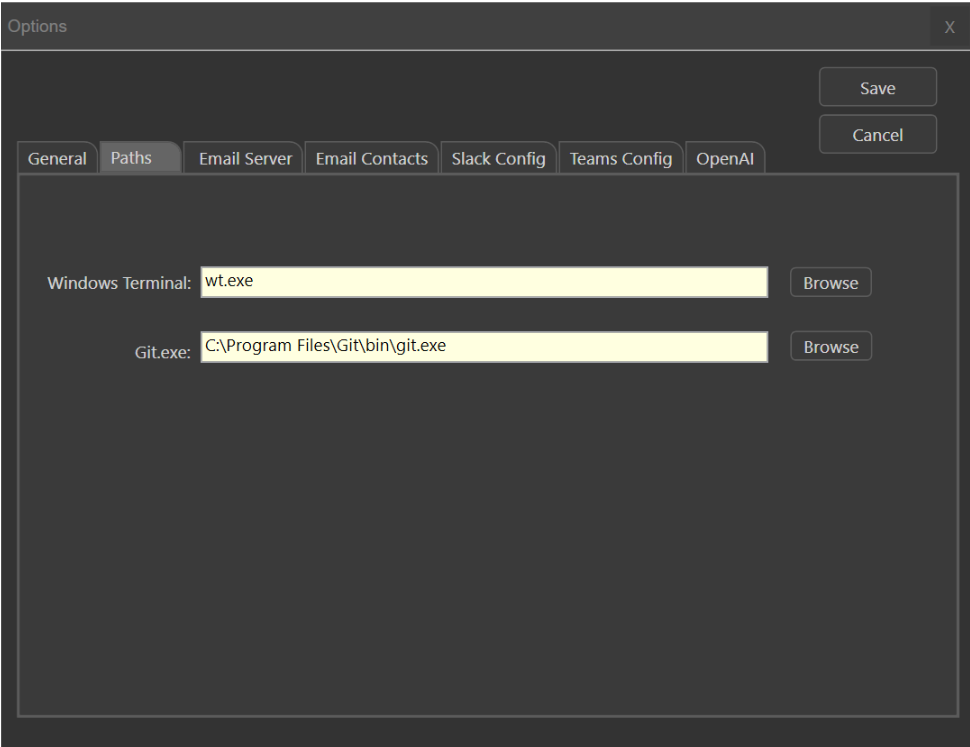
Windows Terminal
Must be installed from Windows Store. You will need to add it’s executable name to the Windows Terminal options screen:
Git for Schedules
You must specify the path to git.exe executable in order to enable the scheduling of Git commands.
The schedules are executed behind the scenes using the Git executable.
Normally the required git.exe is located here:
“C:\Program Files\Git\bin\git.exe”
It may vary depending on your configuration.
Online Tutorials
GPT-3 Artificial Intelligence Integration
OpenAI API Key
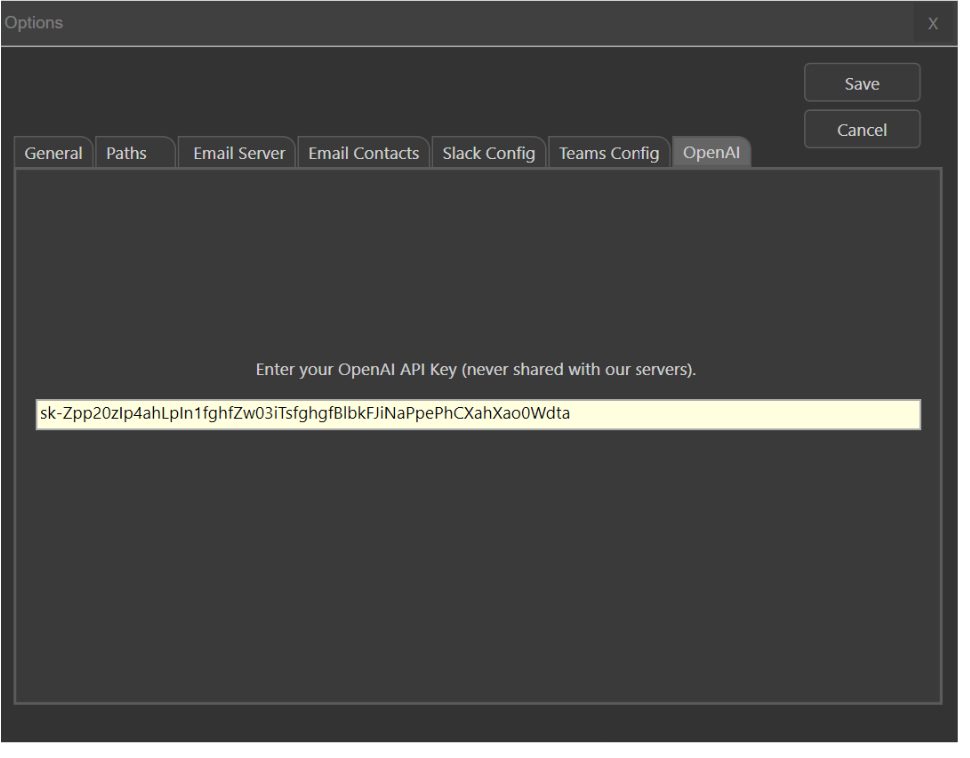
Once you obtain your OpenAI API key, you can enter it in the options screen. This will allow you to access all CommandGit AI features. Your API key will never be shared with our servers and it is encrypted while in the settings file on your workstation.
The default AI model used is “text-davinci-003”
Create a command on the fly
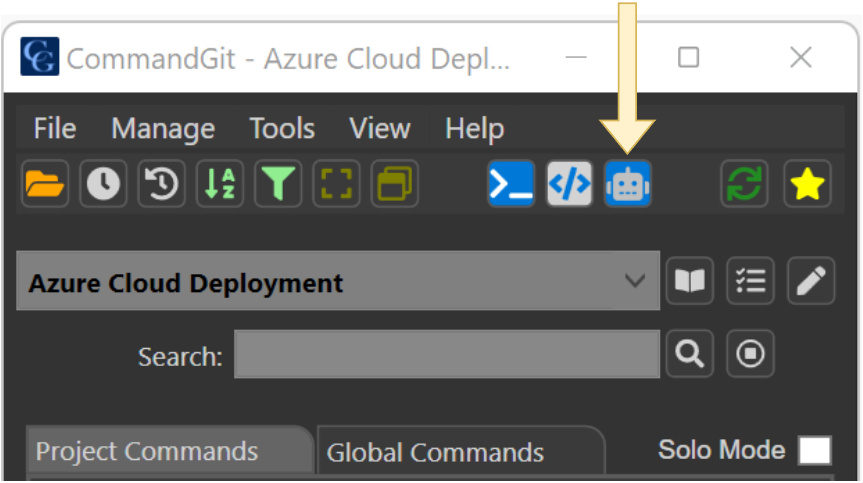
You can use natural language to describe a command and CommandGit will use AI to generate the command for your description. Specify the terminal type at the beginning of your command description in order to generate the proper command for the terminal shell.
Example Git command: git show me last 3 commits that include word bug in the commit message
The AI generated command will be: git log -3 –grep=”bugfix”
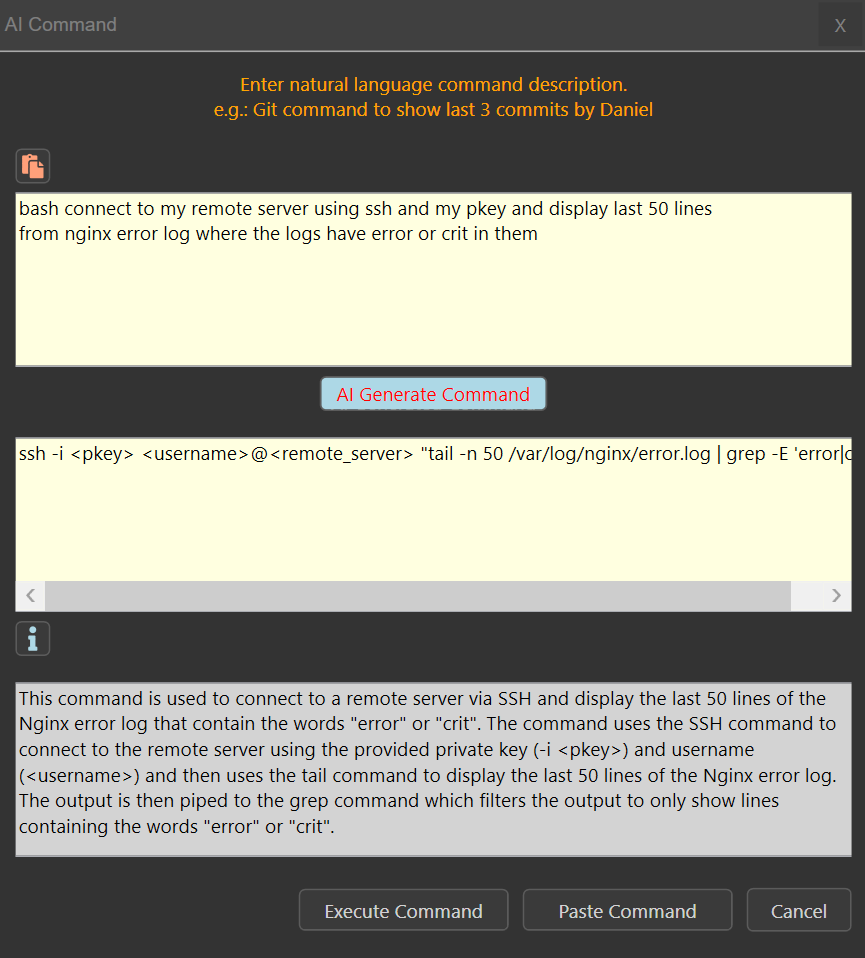
Example Bash command: bash connect to my remote server using ssh and my pkey and display last 50 lines from nginx error log where the logs have error or crit in them
The AI generated command will be:
**ssh -i
If you would like to also see an AI generated description for this command, click the info button.
Here is the description for that command:
This command is used to connect to a remote server via SSH and display the last 50 lines of the Nginx error log that contain the words “error” or “crit”. The command uses the SSH command to connect to the remote server using the provided private key (-i
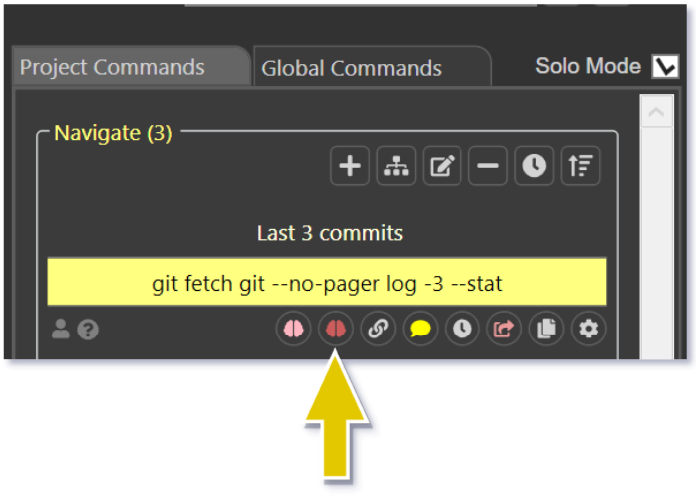
Command Explanations: Getting Detailed Descriptions with AI
Get detailed descriptions for any command at the click of a button with our new artificial intelligence feature. The descriptions will be displayed in the command’s notes section for easy reference and can be saved for later use, helping you to make the most of your monthly allocation of free AI words. Need to revisit a previously looked up command? Simply check the command notes section for a quick reference. Whether you are a beginner or an experienced user, AI is here to help you get the most out of CommandGit.

Generating a List of Similar Commands
CommandGit’s AI feature allows users to generate lists of similar commands based on the command clicked and save them for future reference. By simply clicking on a command, users can easily find related commands that may be useful in their workflow and save them for later use. This can be particularly helpful for those who are new to the application or for those who want to discover new commands that can help them work more efficiently. With the ability to generate and save lists of similar commands, CommandGit makes it easy for users to find the information they need and get the most out of the application.
Generating Custom Commands with AI: Simply Describe Your Desired Outcome
Generate new commands simply by describing the desired outcome. Whether you are an experienced user or new to the application, you can easily create custom commands by writing a description of the command you need. Simply type in a brief description of what you want the command to do, and CommandGit’s AI will generate a single, relevant command that can help you achieve your desired result. This innovative feature makes it easy for users to create custom commands that are tailored to their specific needs, saving time and effort in the process.
Improve Your Writing: Use AI to Correct Grammar, Spelling, and Sentence Mechanics
A helpful feature for users who want to improve the quality of their writing when using the application. Whether you’re creating a new commit message or inputting data for any other command using a command placeholder, you can use the AI-assisted grammar, spelling, and sentence mechanics correction tool to enhance your inputs. Simply type in your text, and a button will be available to rewrite and correct your sentences for concision and grammar. You can use this function to try different versions of your sentences until you find the one that works best. This innovative feature can be a game-changer for those who want to communicate clearly and effectively when using CommandGit.

Pre-Created Global Categories and Commands
The global categories and commands that are already pre-created are there to function as an example and can be modified to work in your specific environment. They may not fit all Git branching or naming standards in your existing configuration, but may be used as a starting point. Please make any changes you would like and copy/move/organize them as you see fit. Copying commands from global categories should help you in creating new projects and provide you with some guidance about the function and usage of this software.
The pre-created commands are there to help you along the way, but you should still exercise care and your discretion when executing any commands.
Recommended initial steps:
Required step before using CommandGit:
Install Git with Git Bash.
Most of the sample commands are designed to work with Bash unless otherwise marked for another shell.